


General
Is the browser you’re using displaying errors, especially slow, or even freezing-up?
There are a few easy steps you can do that can help solve these browser issues – just click on your browser version within the tutorials below to get to the right steps:
1. First try clearing your browser’s cache with this tutorial
2. And/or clear the browser’s cookies following this tutorial
Please be sure to exclude options such as your saved passwords, recently visited sites/browsing history.
One45 has a process in which emails will be sent to remind a user that there is something requiring their attention within One45 such as an evaluation to complete or results of an assessment to view. Within these emails, a one time link may be provided with which the user may click on in order to quickly log them into the system without requiring the username or password. When this link is clicked, it will log the user into One45 but will only allow the user to see their to dos page and this link will no longer work for future use.

If you wish to see your full One45 page you must log in using your username and password.
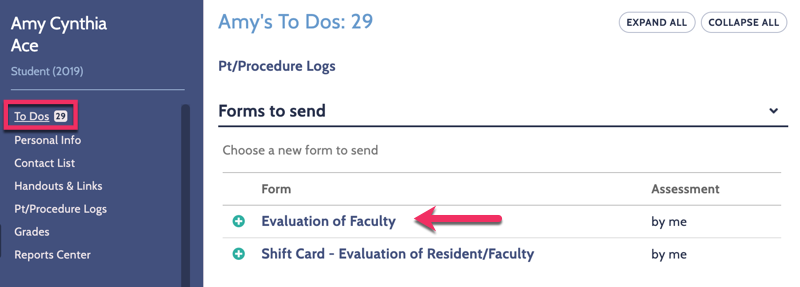
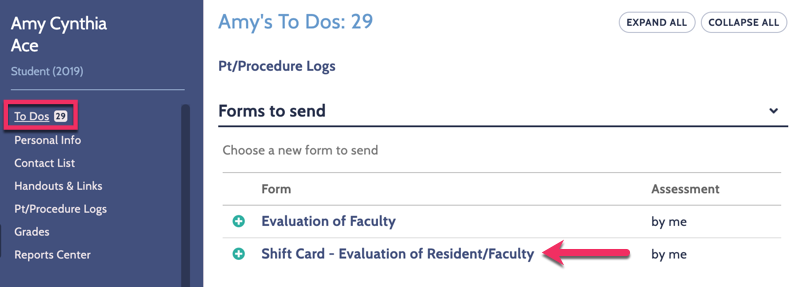
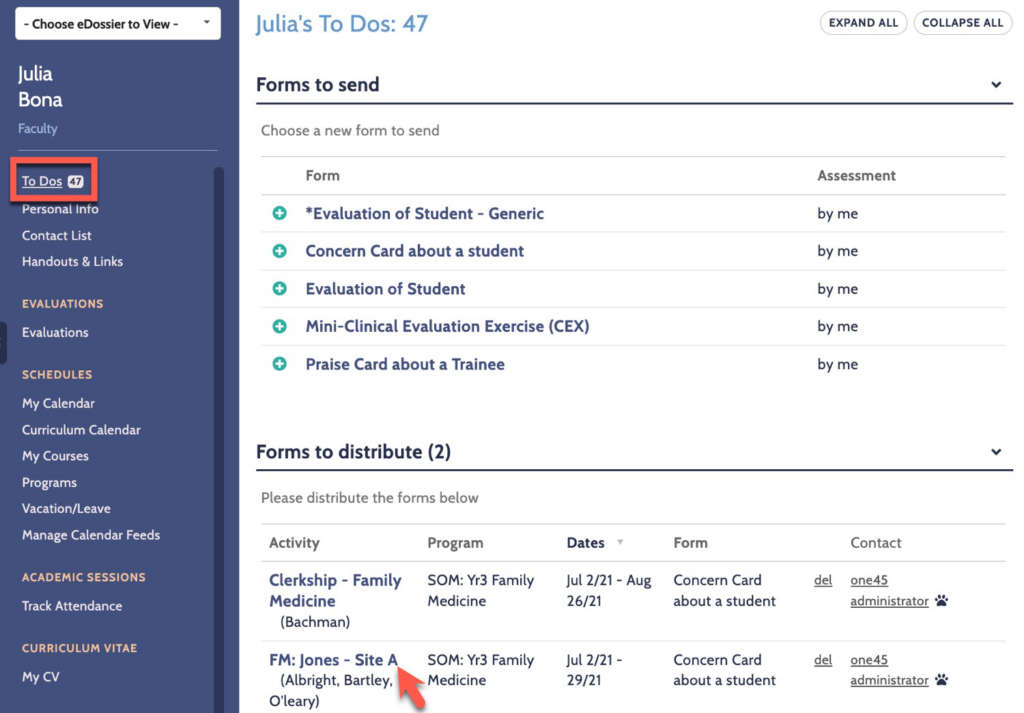
To send yourself a form to complete:
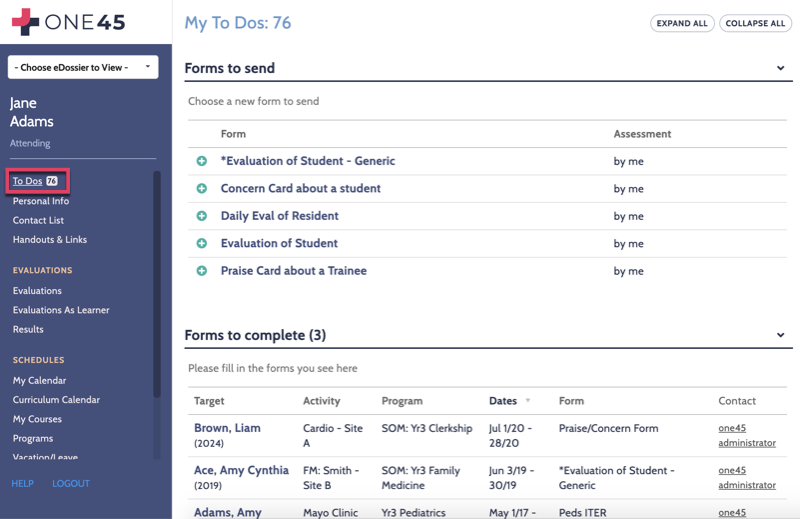
1. Log into One45.
2. At the top of your To Dos page, under Forms to send, click on the name of the form or the green ‘+‘ icon to the left of the form name (please note that if you do not have this option at the top of your page, it might mean that it is not set up for your program).
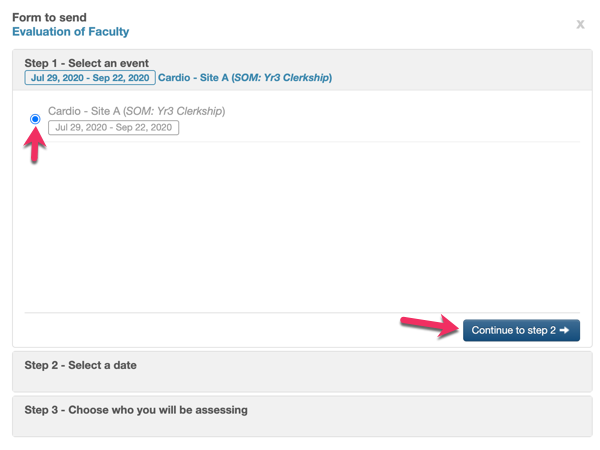
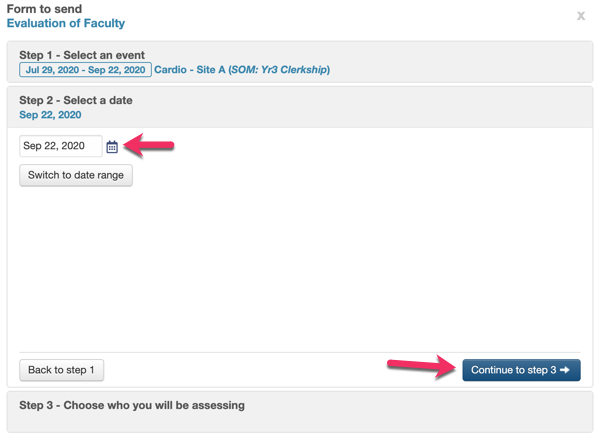
3. In the first menu, select the appropriate event. Be careful! You can find several events to choose from in the drop down and it is very important that you choose the right one. Read the full title to make sure it is the event you want to complete (Name of the rotation :: Name of the program :: Date). Click Continue to step 2.
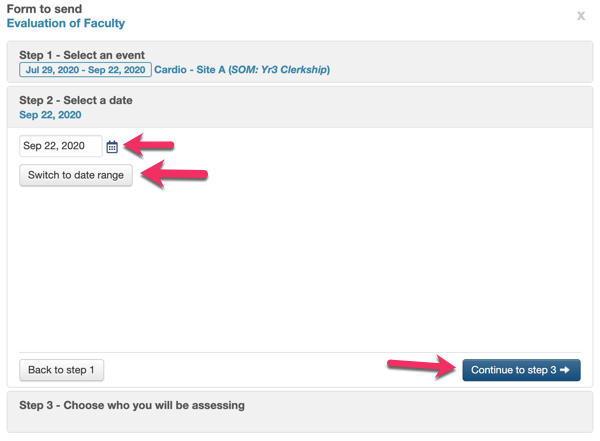
4. Select the date. To select a date range, click on Switch to date range and enter the start and end date.
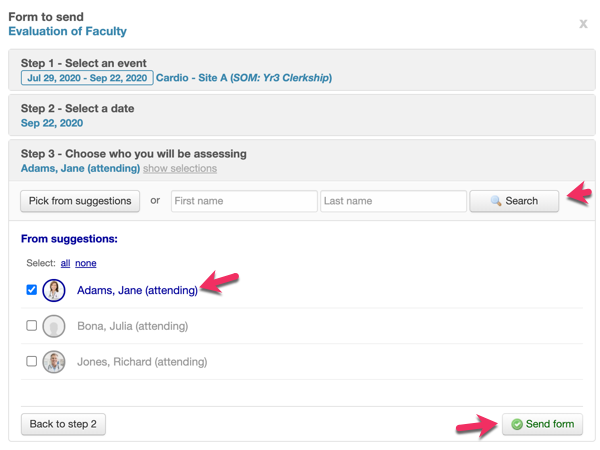
5. Choose the person who you will be assessing. You can choose from a list of suggestions or by typing either the first or last name of the person you wish to choose. Click Search to bring up a list of potential matches. Find the person you wish to choose on the list and click the checkbox next to their name. You may choose to send to multiple people by checking more than one name. Once you are happy with who you have selected, click Send form. If this is an evaluation of a rotation or a survey you will not be required to complete this step.
6. A new tab will open with the form to complete and also your To Dos will refresh and a form will be available under the forms to complete section for you to fill in.

To send a form for your evaluator to complete:
1. Log into One45.
2. At the top of your To Dos page, under Forms to send, click on the name of the form or the green ‘+‘ icon to the left of the form name (please note that if you do not have this option at the top of your page, it might mean that it is not set up for your program).
3. In the first menu, select the appropriate event. Be careful! You can find several events to choose from in the drop down and it is very important that you choose the right one. Read the full title to make sure it is the event you want to complete (Name of the rotation :: Name of the program :: Date). Click Continue to step 2.
4. Select the date. To select a date range, click on Switch to date range and enter the start and end date.
5. Choose the person who will be assessing you. You can either pick from the list of suggestions provided or by typing either the first or last name of the person you wish to choose. Click Search to bring up a list of potential matches. Find the person you wish to choose on the list and click the checkbox next to their name. You may choose to send to multiple people by checking more than one name. Once you are happy with who you have selected, click Send form.
6. Your evaluator will receive the form to complete on you.
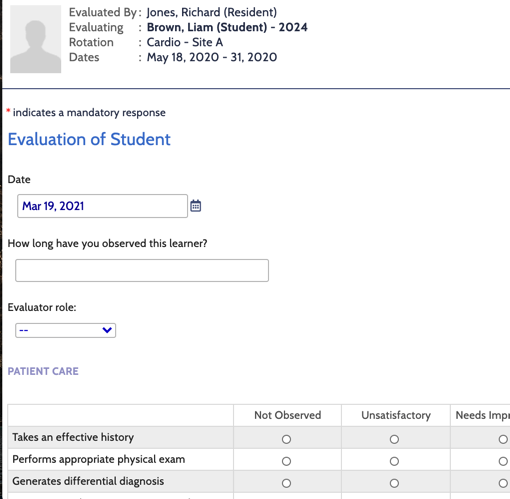
Forms can be sent out with the option for the evaluator to opt out of completing the form. If this option is enabled you have the ability to opt out of completing an evaluation and you will see the opt out option at the top of the evaluation form:
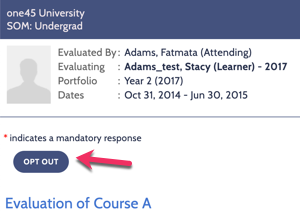
If this is selected, the form will be deleted and removed from your To Do list.
When an individual receives an item to complete in the One45 system, they will receive an email notification (unless the sender has decided not to send out an email notification).

1. The individual can follow the auto login link in the email message or enter their username and password through the log in page. First time users will have a link displayed in the email message.
First time users will be asked to change their password when they first log on. It is important to write this password down. If this password is forgotten, it must be reset by clicking on forgot my password on the login page.

2. After logging on, users are sent to their To Dos box. To complete the item, users click on the link.
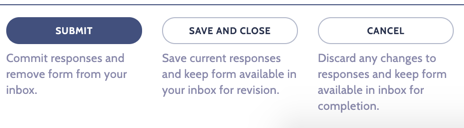
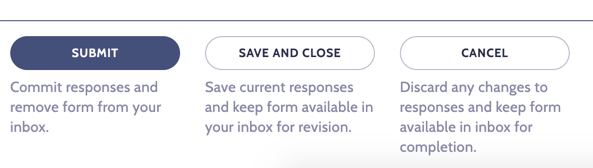
3. Once the user has completed the evaluation, they can choose to:
– Submit – which completes the form
– Save and Close – which saves what they’ve completed so far and keeps the form in their To Dos
– Cancel – which will not Submit or Save but will leave the form in their To Dos to complete at a later date.
4. When a user has completed their “To Do” items, they will log out of the system.
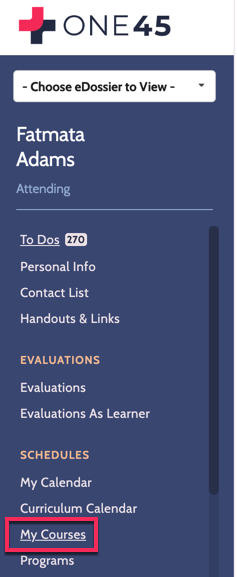
Learners have access to the Curriculum Explorer via the My Courses page from the eDossier.
Facilitators or administrators also have access if assigned a role in the Curriculum Management tool, for details on assigning curriculum roles, please click here.
You will be able to use the Curriculum Explorer to get more information pertaining to the courses, sessions and sections you have access to.
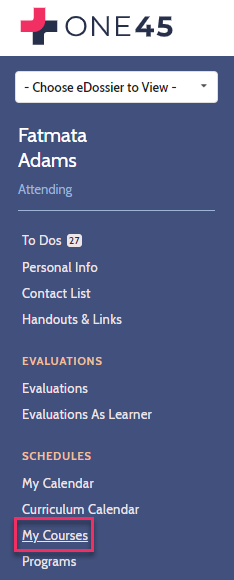
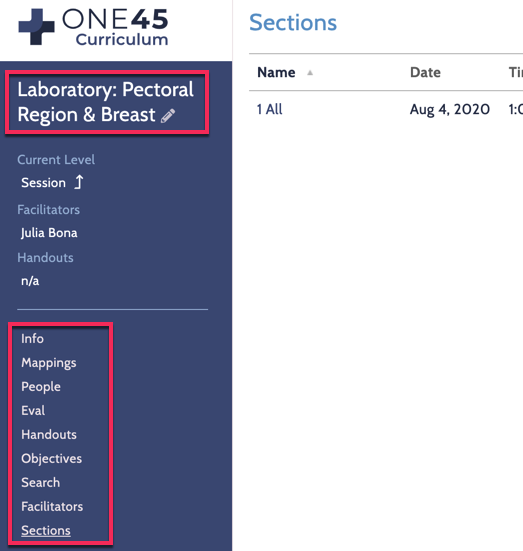
1. To access the Curriculum Explorer, click on My Courses from your eDossier.
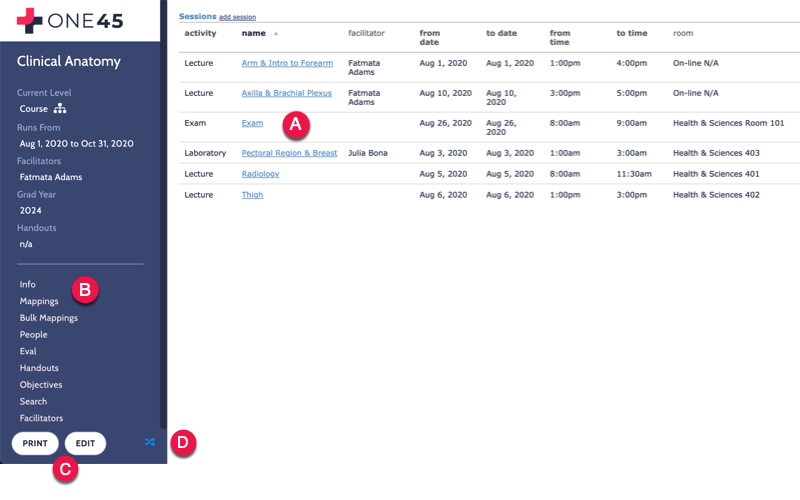
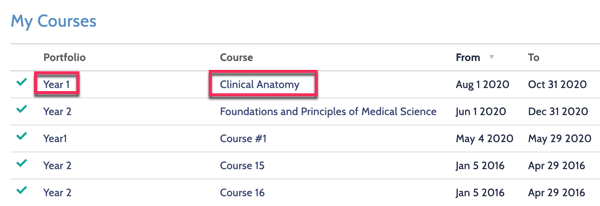
2. You will see all courses you have access to. To view the details of a specific course, click on the course name to view the course details.

3. What you see available to you will depend on the permissions that have been assigned via the curriculum role, you will then be able to view and/or edit various details related to the course.
A. Click through to the session to view or edit additional details.
B. Use the menu bar along the bottom left-side of the screen to navigate to the various details associated with the event: Info, Mappings, Bulk Mappings, People, Handouts, etc.
C. You can print or edit these details if you’ve been provided with edit permissions.
D. You can switch back to the old Curriculum Explorer (eventually this option will be removed).
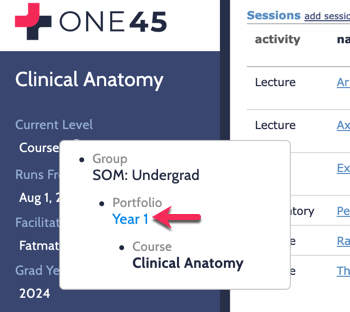
4. To navigate the various levels of the curriculum event you are viewing hover over the icon under Current Level:
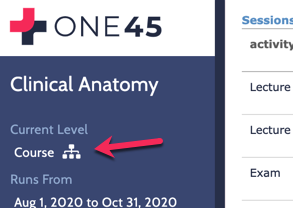
You can click on the blue links to navigate to the level previous:
If the browser you’re using is displaying errors, is especially slow or even freezing-up, it might be time to rejuvenate it!
There are a few easy steps you can do to bring your browser up to speed – just click on your browser version within the tutorials below to get to the right steps:
1. first trying clearing your browser’s cache with this tutorial
2. and/or clear the browser’s cookies following with this tutorial
Please be sure to exclude options such as your saved passwords, recently visited sites/browsing history.
We are often asked which browsers will work with One45. Below is a list of the desktop and mobile browsers we currently support.
Desktop
- Up-to-date versions of Firefox
- Up-to-date versions of Chrome
- Up-to-date versions of Safari
- Up-to-date versions of Internet Explorer 11 (until Microsoft stop supporting it)
- Up-to-date versions of Microsoft Edge
Mobile
- Chrome on Android
- Safari on iOS
One45 Mobile Help
The mobile eDossier enables users to quickly complete tasks and view important information while on the go from the web browser on their mobile device.
How it works:
1. Users who log into One45 via a web browser on their mobile device will be redirected to the mobile eDossier.
2. Users will be taken to directly their To Dos where they can complete critical tasks
How does the mobile eDossier differ from the desktop site?
- The menu has been hidden to optimize screen space
- The To Dos tables have been collapsed to optimize screen space
- On a user’s To Do list, the first column is now “frozen” for easy scrolling with context of the table from their device
- Form completion has been optimized to the mobile device, most noticeably, likerts which now show on mobile devices as a single, vertical grid
- The Duty Hours > Make Report option is only available on a desktop browser – this option will not appear when accessing duty hours from a mobile browser.
- On the Evaluations (Learners) page, reporting options such as Print View and Bulk Print Options are not available only from a mobile browser
The functionality of the mobile eDossier is being improved over time.
What is currently optimized to do on a mobile device?
- Initiating Forms to Send (including EPA Forms to Send)
- Completing a form or a procedure log
- Setting up a calendar sync
- Viewing your Personal Info
- Viewing your Courses
- Viewing your Rotations
- Entering Duty Hours
- Viewing your Results
- Viewing the Contact List
- Viewing Handouts and Links
- Entering and reviewing Vacation and Leave
- Viewing Evaluations (which also now includes the form name)
- Tracking Attendance
Click here to check out the video that explains how to create a shortcut on your phone or tablet home screen for easy access to One45 from your mobile browser.
Help for Students/Residents
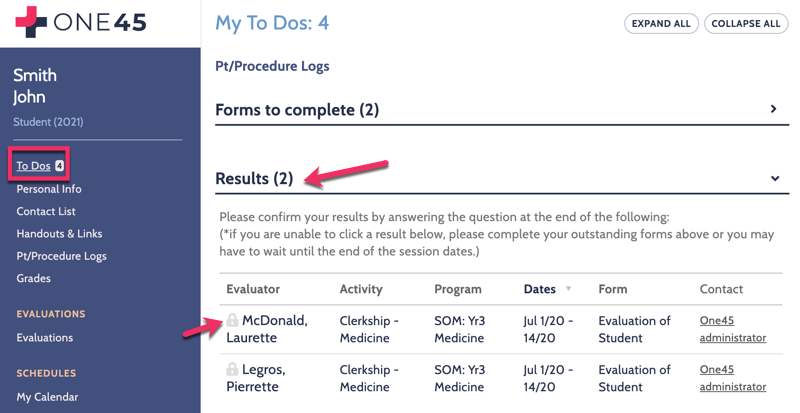
If you are unable to view the results of a completed evaluation form in the Results section of your To Do’s, it is likely because of the following reasons:
1. You have outstanding forms that need to be completed.
2. You have outstanding forms that need to be completed for this rotation.
3. You have completed all of your forms, both for the rotation in question as well as all outstanding forms, but the rotation itself still hasn’t finished. You will need to wait until the rotation dates are over in order to view the results of the evaluation(s) that have been completed on you.
The student’s eDossier is an electronic folder. It is the interface through which students access the One45 system (e.g., to complete evaluations, to view your schedule, to check your marks, to download handouts and notes).
Most of the information in eDossiers can only be edited by administrators.
The eDossier consists of a number of pages: note – some programs may not use all of the following pages in their eDossiers
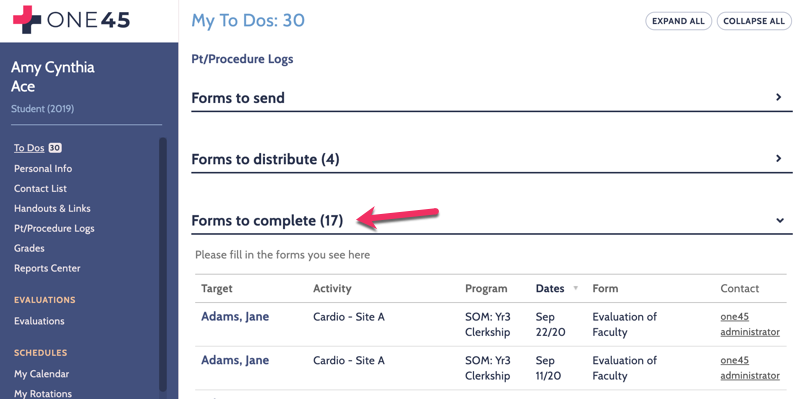
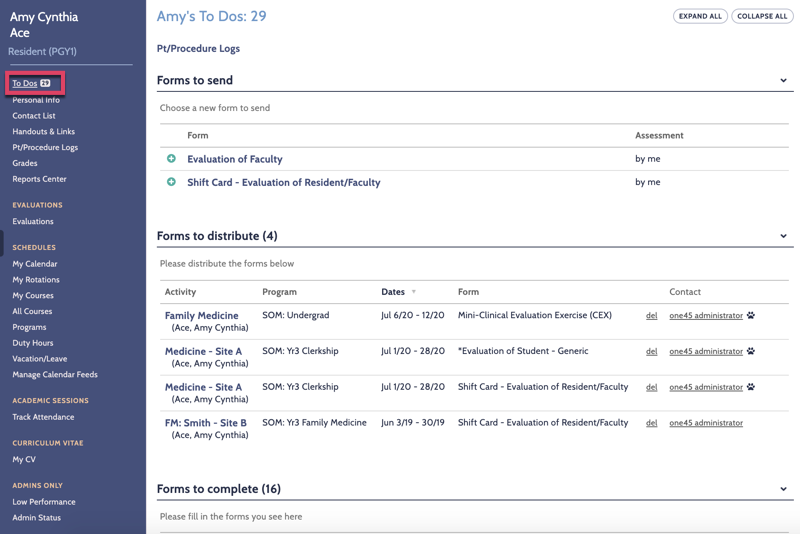
To Dos
The To Dos consist of a list of tasks that students have to complete. It is the default page that loads when they log into the system.
Examples of To Dos would be forms to complete, forms to distribute, form results to view, forms to send, lottery surveys, attendance tracking…)

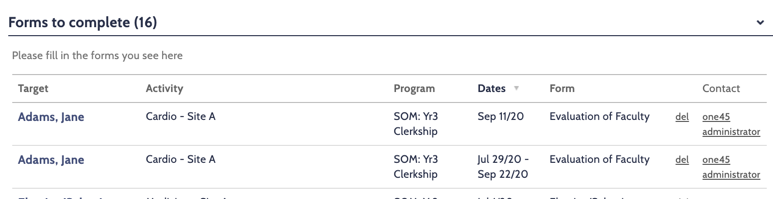
Forms to complete:
When an administrator sends an evaluation form to complete or review, the form automatically appears as a new task (usually, students also receive an email with each new task). To complete a task, students click on its name under Target and follow the questions. Once submitted, forms are removed from the To Dos.
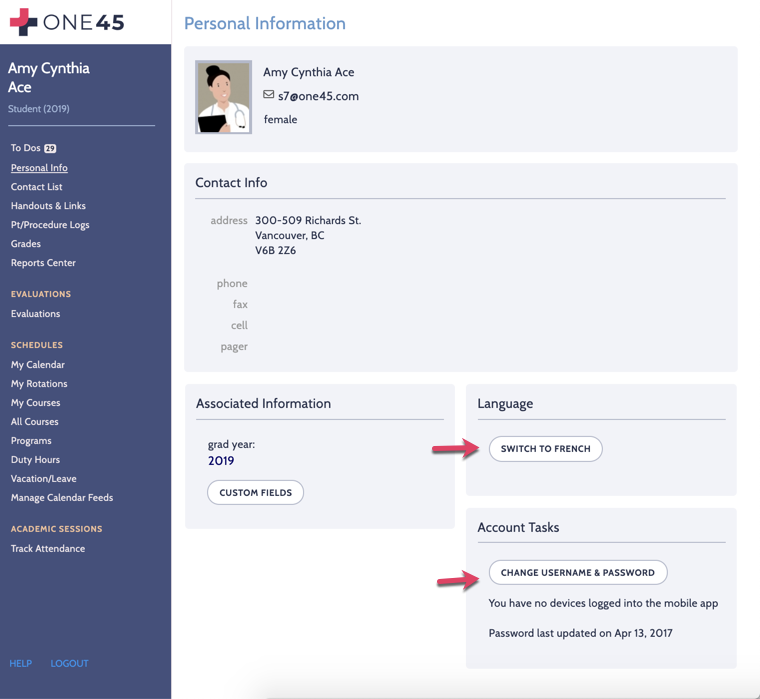
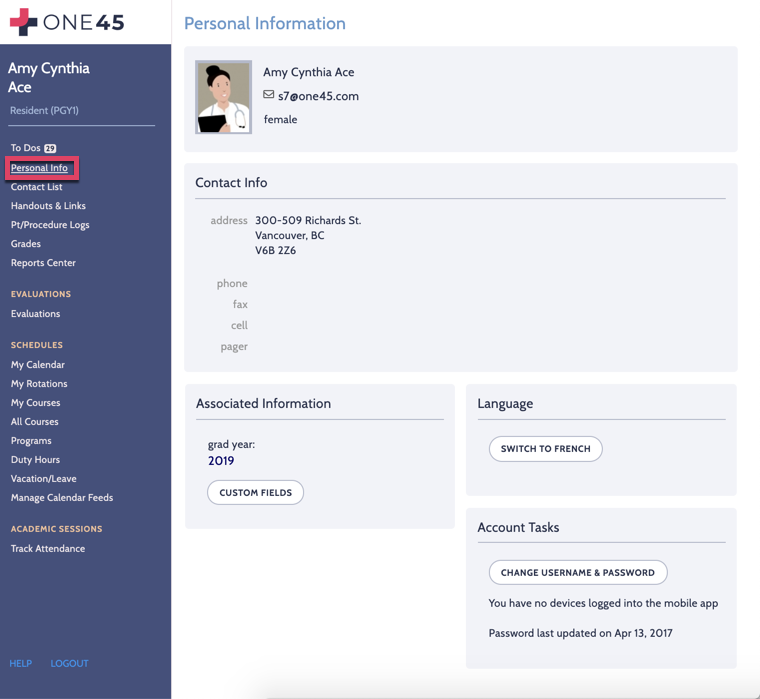
Personal Info
The Personal Info page contains the students contact information, a headshot photo (if photos were imported to the system) and the current graduation year. It is very important that this information is kept up to date. To change any of the students’ contact information, please contact your main administrator.
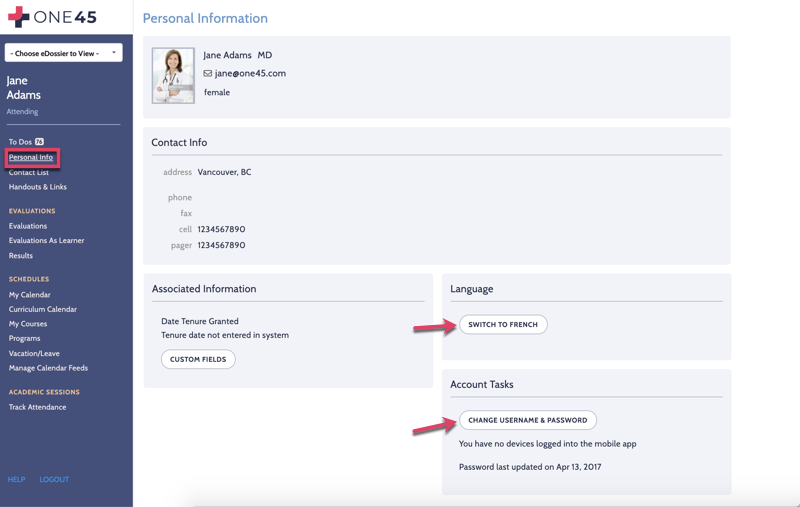
This page is also where students can change their One45 credentials (username and password). To do this, they click the change username/password link. A new page appears where you can update this information. Note that you cannot reset a password that has been forgotten from that page.
This page is also where you can change the language to French (if applicable). To do this, click the Switch to French link.
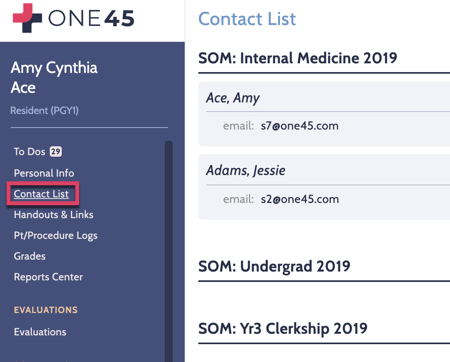
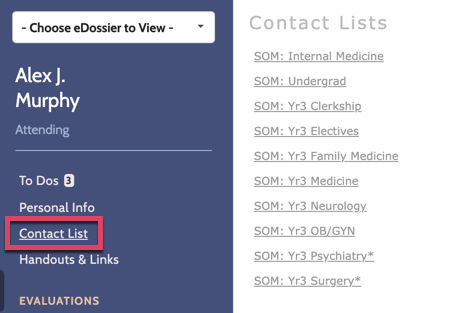
Contact List
The Contact List contains email addresses for all the students in your program(s) and graduating year.

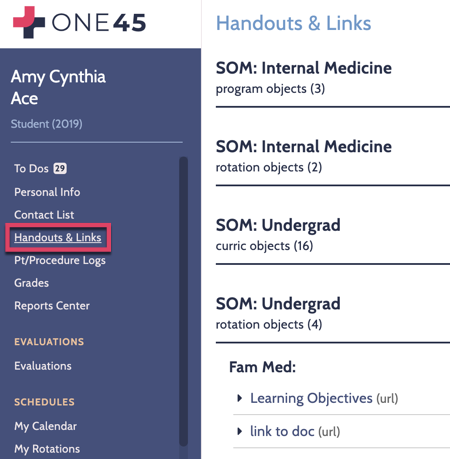
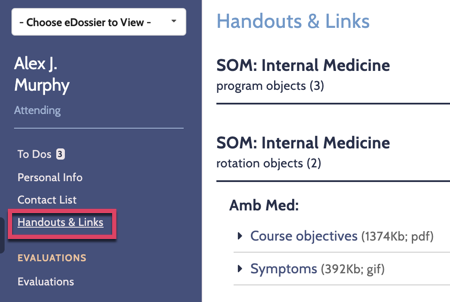
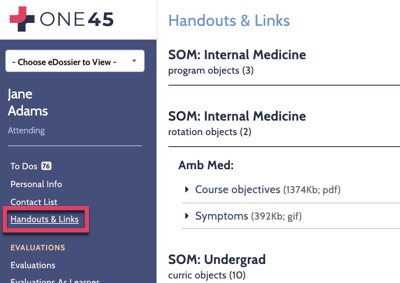
Handouts & Links
The Handouts & Links page contains links to the handouts and notes associated with each of the program you are enrolled in. Objects are organized under three headings: Program (for objects pertaining to the entire program), Sites (for objects pertaining to specific sites within the program) and Rotations (for objects pertaining to specific rotations within the program).
A few examples of learning objects are rotation objectives, reading lists, maps, websites and journal articles. You can click on the links to download personal copies or to visit specific websites (this option is also available in the Schedule page).
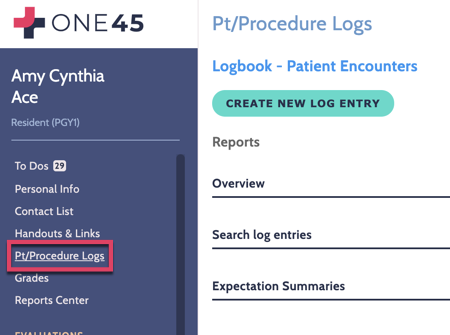
Patient/Procedure Log
The Patient/Procedure Log is where you can keep a record of the patients you have seen and the procedures you have performed on them. You can also view a summary of your log entries and perform a search to find a particular patient or procedure.

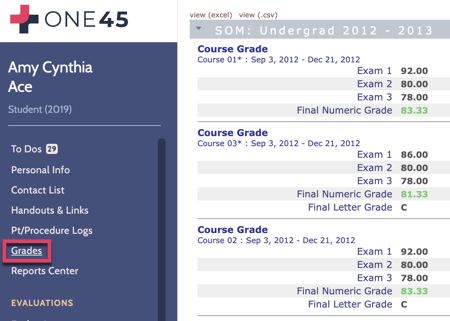
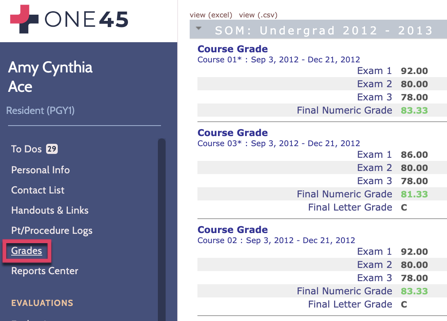
Grades
The Marks page is where you can view the results of your examinations and your overall average for the year.
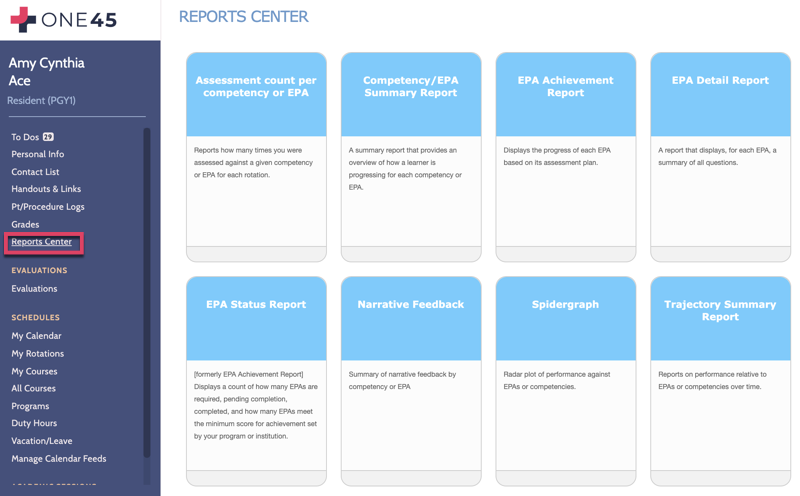
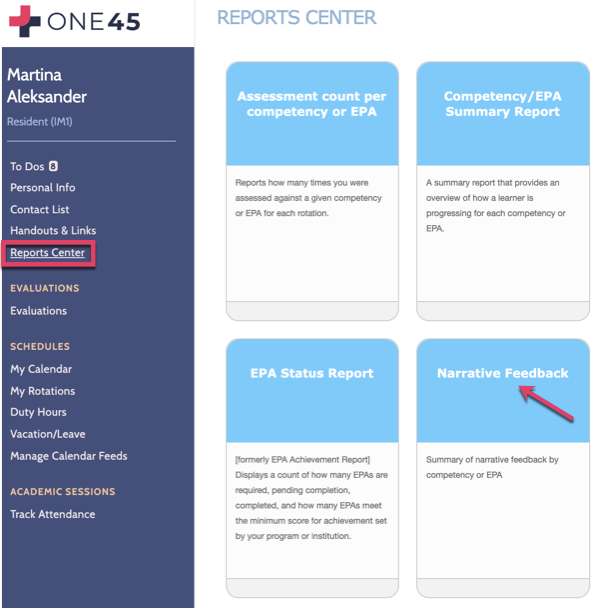
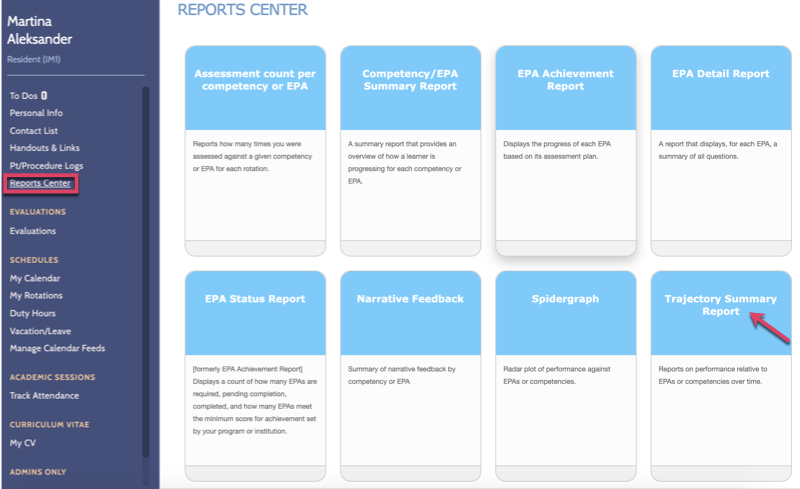
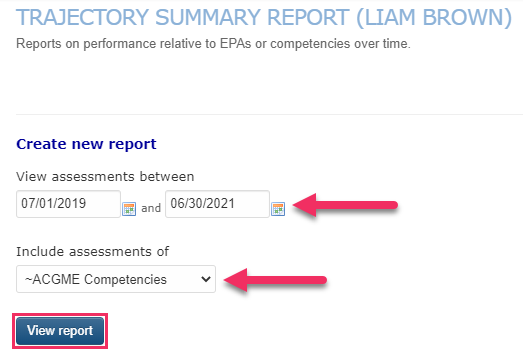
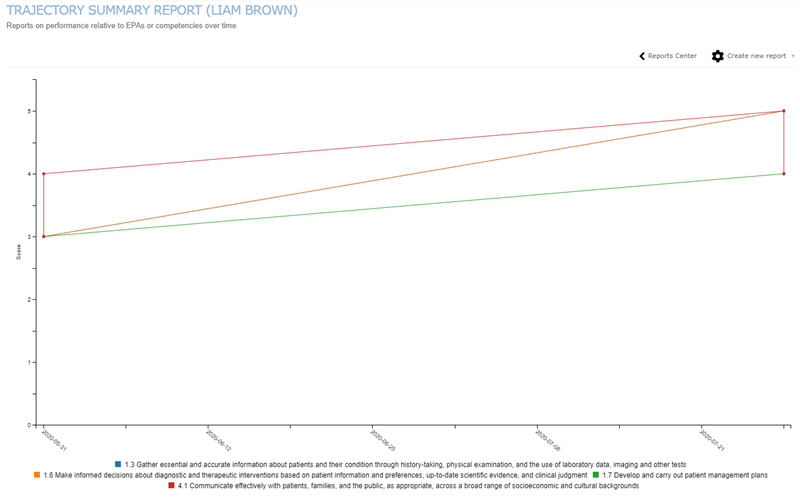
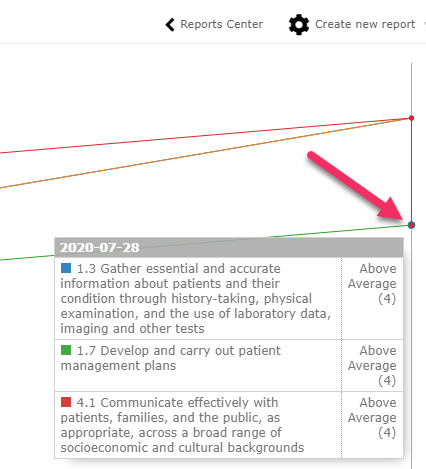
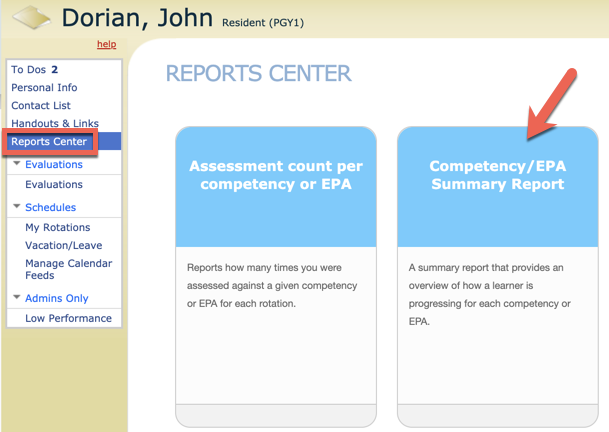
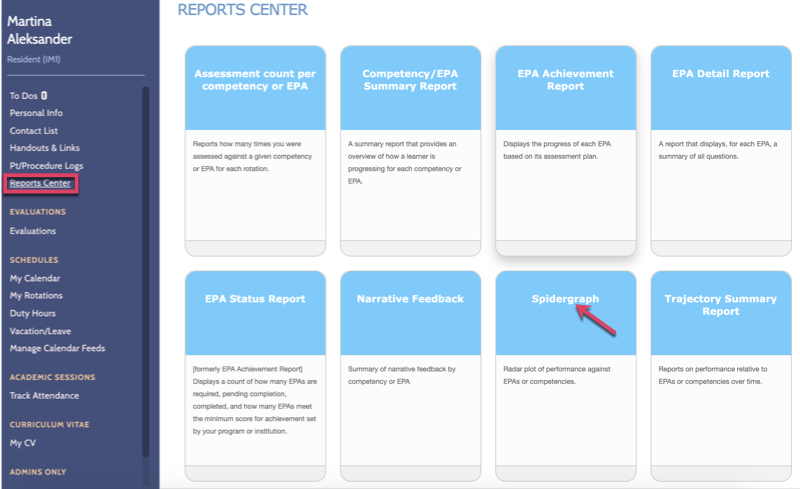
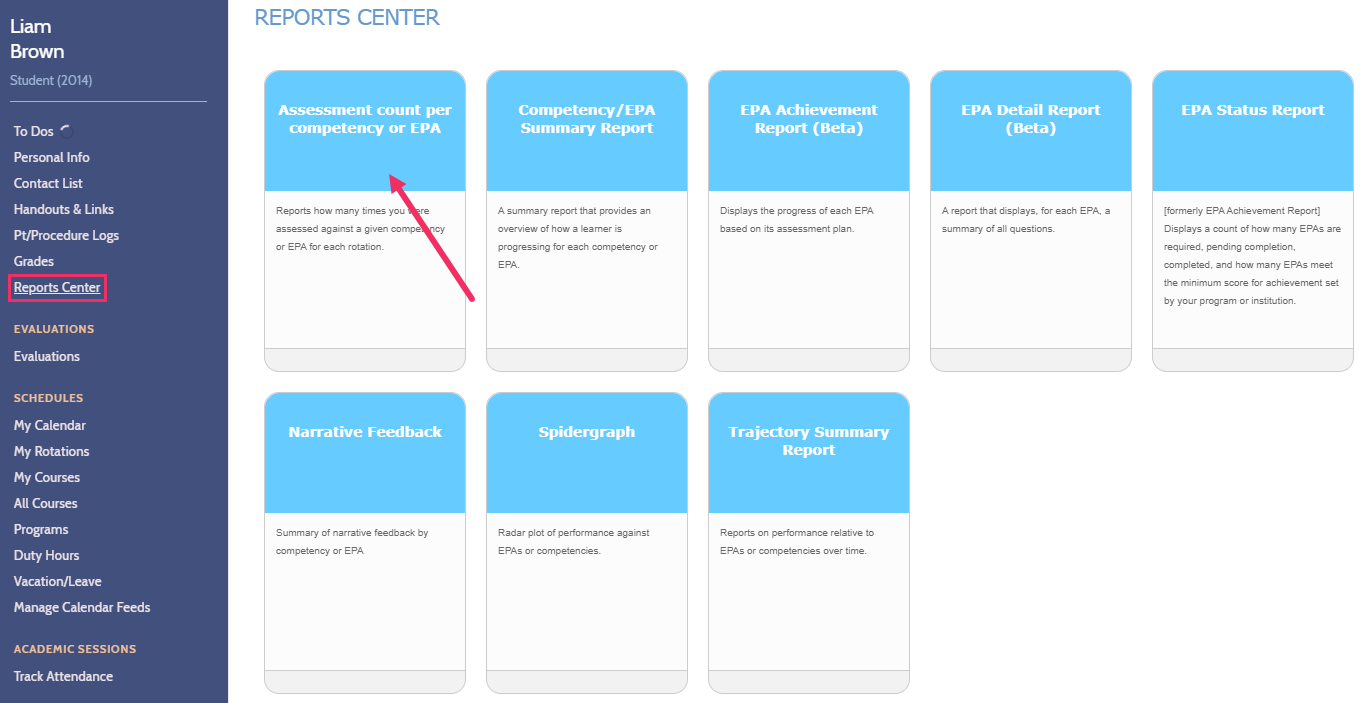
Reports Center
Only available if the EPA/CBD solutions are activated at your institution.
Students will review their progress through many different reports here.

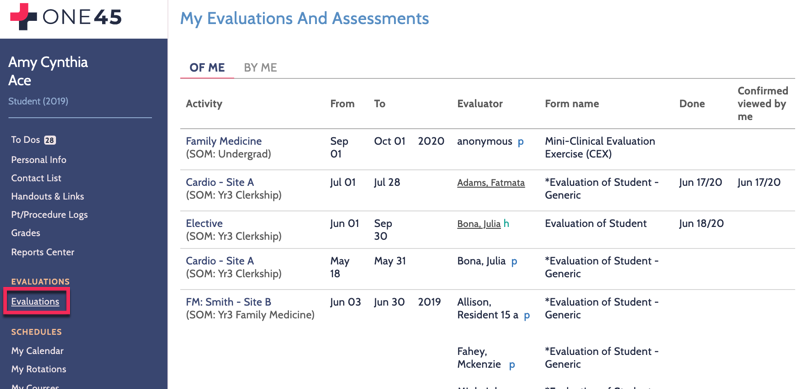
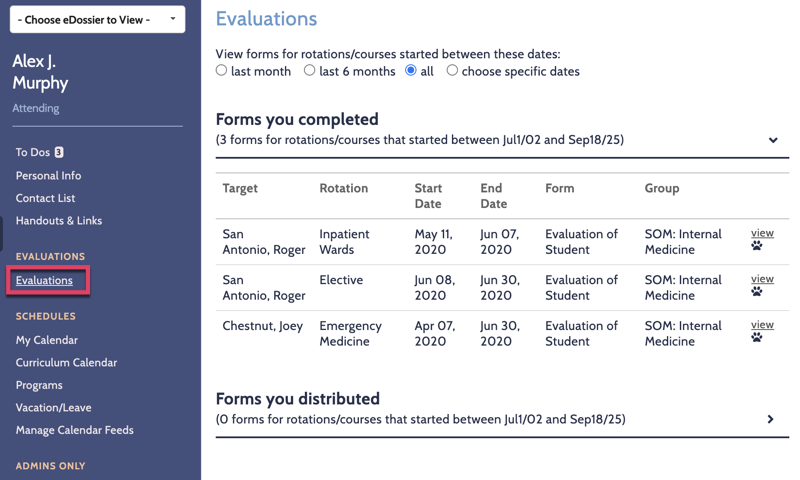
Evaluations
The Evaluations page is an archive of the evaluations students have completed (By Me) as well as the evaluations of their performance (Of Me). The archive includes the evaluations that have been requested but that have not yet been completed.
You can view or print the results of your performance evaluations. If the name of an evaluator is underlined, you can click on it to view the results.

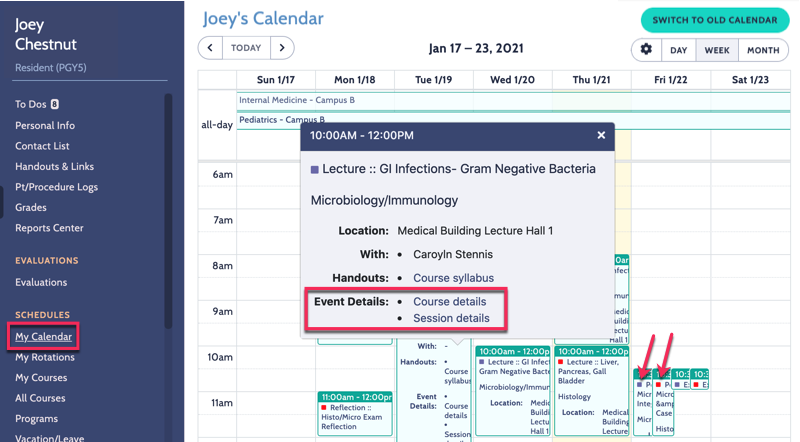
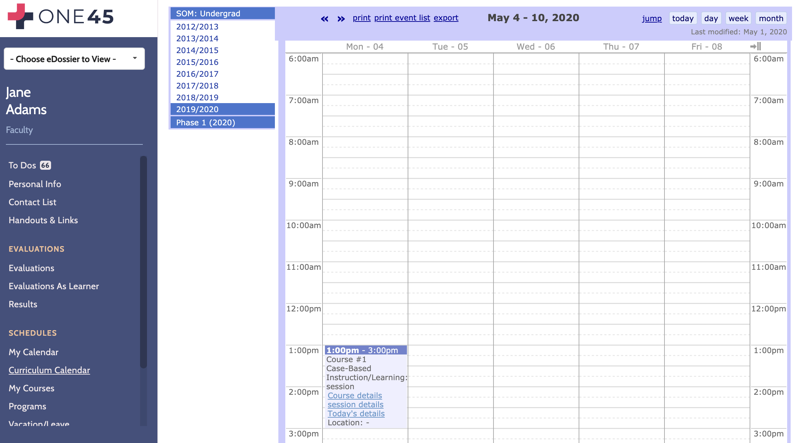
My Calendar
The My Calendar page allows you to view curriculum courses and academic sessions (daily events) that the students are registered into. You can select a specific time frame to view the events by selecting day, week, or month on the top right hand corner. Once you have made your selection you will be able to see the events scheduled for the timeframe in the calendar below.
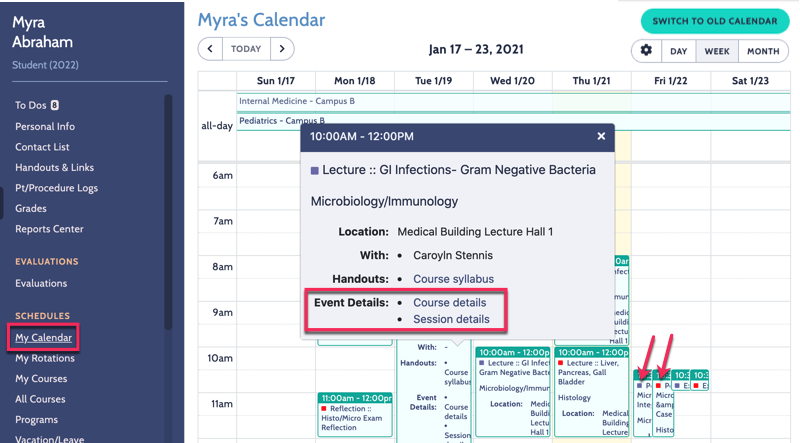
To view the specifics of an event you must click on the event name and a box will open which displays the information such as the topic, date, speaker, and location of the item. On the top left hand corner of the page you can choose to print the calendar or export it to another calendar system that you regularly use such as iCalendar or Outlook.
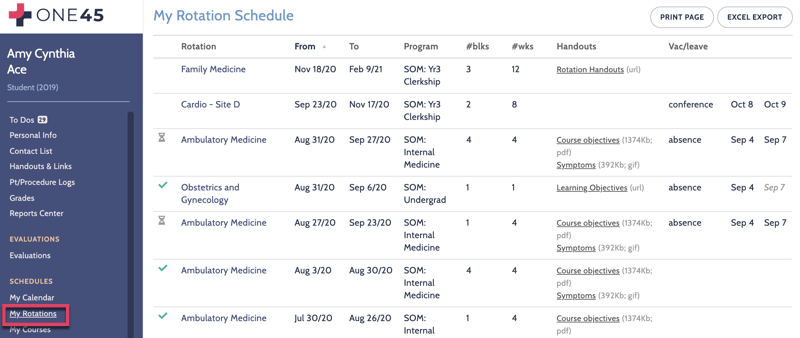
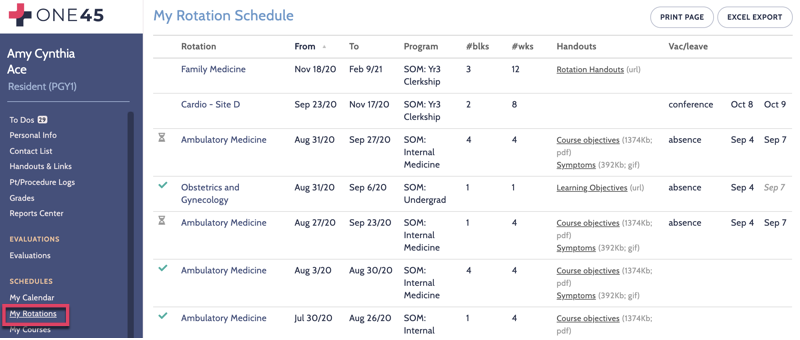
Rotations
The My Rotations page consists of your rotations schedule for the current academic year. Rotations are listed in chronological order. If you have leave time scheduled during a rotation it appears under the Vacation/Leave column. Similarly, handouts (e.g., objectives, reading lists) associated with specific rotations appear under the Handouts/Notes column. You can view or download them by clicking on their titles.
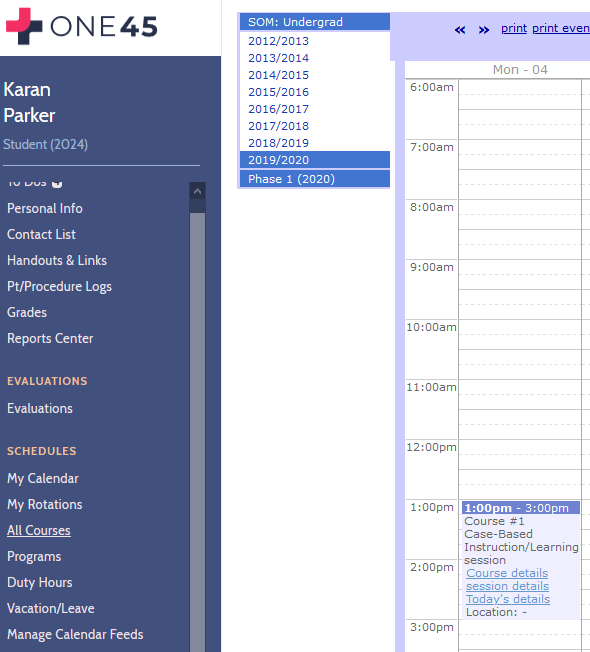
All courses
Curriculum (non clinical) courses and information that the students are registered into, will be displayed under this link, in a calendar view. Students can view the details of the event when clicking Course, session or Today’s details.
Duty hours
The Duty hours solution is only available on demand. Students will be able to record their on and off duty hours and report on them from here.
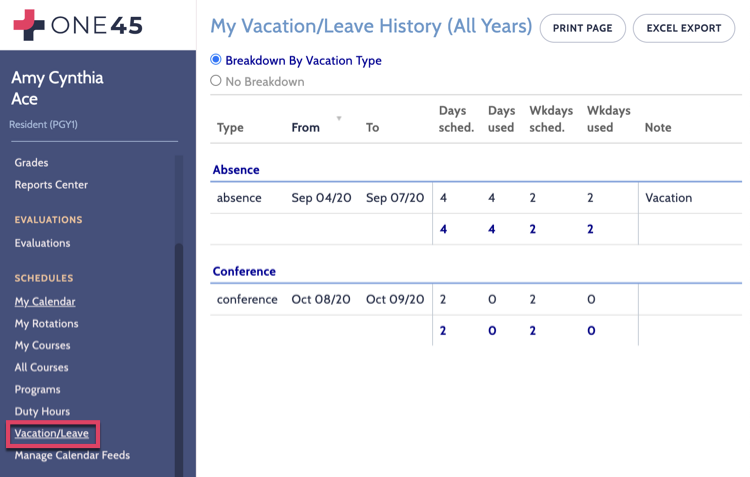
Vacation/Leave
The Vacation/Leave page shows a summary of the students scheduled leave time. Leave time is categorized by the reason for the leave (i.e., vacation, conference, interview, sick). The last category (other) is reserved for special circumstances (e.g., bereavement). To schedule leave time, you must contact your program administrator.

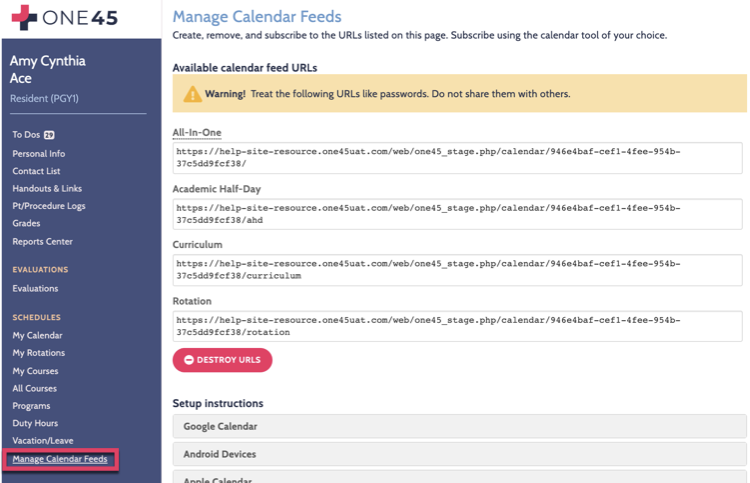
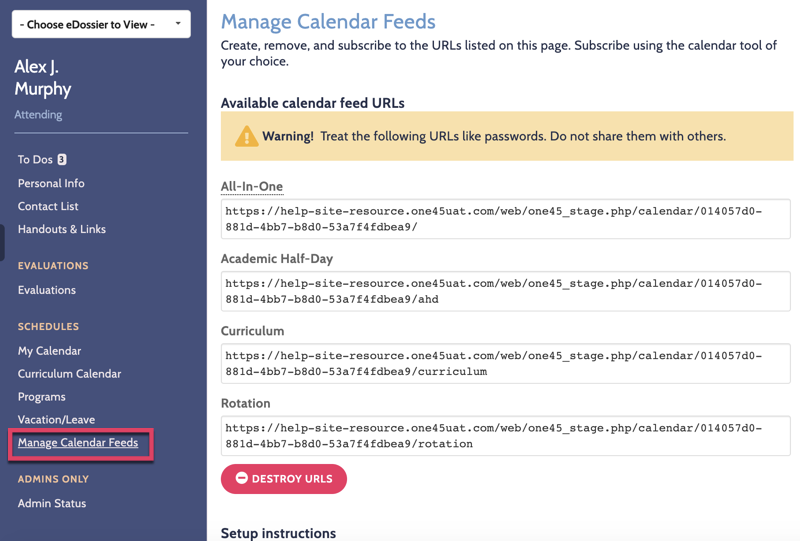
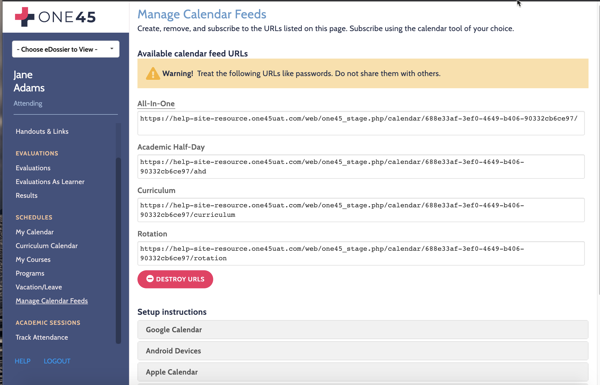
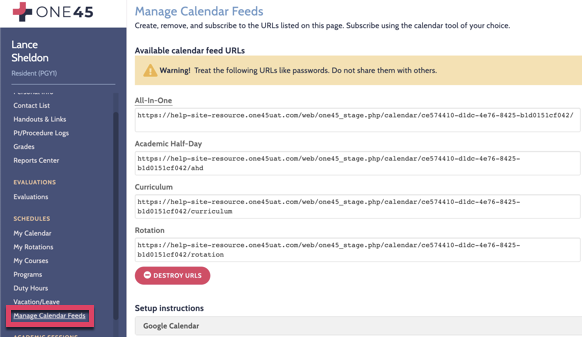
Manage Calendar Feeds
For schools that have this option enabled, you will be presented with the opportunity to sync the contents of your One45 calendar (Academic Half Day Events/Rotation Schedule/Curriculum Events) to a supported app.
In your eDossier click on Manage Calendar Feeds under Schedules. If you haven’t already done so, click on Generate subscription URL.
Once a URL has been generated, copy the URL and follow the tool or device-specific instructions given on this page to subscribe to the calendar URL.

Track Attendance
Students attending Academic sessions can track their attendance (after the event) from their eDossier. This is not set up by default and program administrators must select this option to give it to the attendees.

Your eDossier (or electronic dossier) is an electronic folder of important information about you and your experiences as a resident. It is the interface through which you access the One45 system (e.g., to complete evaluations, to view your schedule, to check your marks, to download handouts and notes). By storing all your information in one place, the eDossier streamlines the administrative process and reduces the risk of transmission errors.
Most of the information in your eDossier can only be edited by program administrators.
Your eDossier consists of a number of pages:
Please note: some programs do not use all of the following pages in their eDossiers.
To Dos
The To Dos page consists of the list of tasks that you have to complete. It is the page that appears by default when you first log into the system. The most common tasks that you will perform here are attending and rotation evaluations and reviewing evaluations on yourself.
When an administrator sends you an evaluation form to complete or distribute, the form automatically appears as a new task in your To Do list (usually, you also receive a sendout email with each new task). To complete a task, click on its title and follow the instructions. Once you’ve finished a task it is removed from your To Do page.
Personal Info
The Personal Info page contains your contact information, a head-shot photo of you (if your administrator has added one to the system). It is very important that this information is kept up to date. To change any of your contact information, please contact your administrator.
From this page you can change your username and password or change the language to French.
Contact List
The Contact List contains email addresses for all the residents in your program.
Handouts & Links
The Handouts & Links page contains links to the handouts and notes associated with your program, sites and specific rotations that you are scheduled for. A few examples of learning objects are rotation objectives, reading lists, maps, websites and journal articles. You can click on the links to download personal copies or to visit specific websites (this option is also available in the Schedule page).

Patient/Procedure Logs
The Patient/Procedure Logs is where you can keep a record of the patients you have seen and the procedures you have performed on them. You can Create new log entries, see an Overview of your log entries and perform a search to find a particular patient or procedure.
Marks/Grades
The Marks or Grades page is where you can view the results of your examinations as they are released by the coordinator.
Report Center
The Report Center is available to those schools that have One45 CBME tools enabled.
Evaluations
The Evaluations page is an archive of the evaluations you have completed (By Me) as well as the evaluations of your performance (Of Me). The archive includes the evaluations that have been requested but that have not yet been completed.
You can view the results of your performance evaluations. However, at times, it’s possible these results will not be released to you until you’ve completed the corresponding evaluations. If the name of an evaluator is underlined, you can click on it to view the results.
Schedules
My Calendar
The My Calendar page allows you to view your courses and academic sessions (daily events). When you click on this tab you will be able to select a specific time-frame to view the events by selecting day, week, or month on the top right hand corner. Once you have made your selection you will be able to see the events scheduled for the time-frame in the calendar below. To view the specifics of an event you must click on the event name and a box will open which displays the information such as the topic, date, speaker, and location of the item. On the top left hand corner of the page you can choose to print the calendar or export it to another calendar system that you regularly use such as Outlook.
Rotations
The Rotations page consists of your rotation schedule and your academic session schedule. Your rotations are listed from most recent to least recent by default. If you have leave time scheduled during a rotation it appears under the Vacation/Leave column. Similarly, handouts (e.g., rotation objectives, reading lists) associated with specific rotations appear under the Handouts column. You can view or download them by clicking on their titles.
Duty Hours
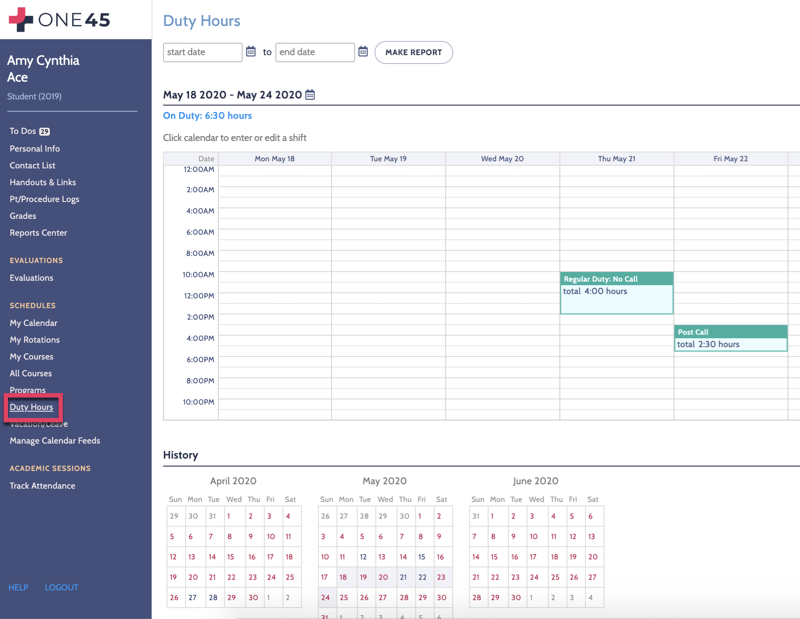
The Duty Hours page allows you to track the shifts you work each day.
Click on the bottom calendar to enter a new shift or to edit an existing shift.
To enter the shift times, click on the bottom calendar for the specific day, choose the type of shift you worked, the date and specific hours for your shift, and the site of your shift. Click Save to add the new shift.
The days that shifts are scheduled will appear in blue on the top calendar.

Vacation/Leave
The Vacation/Leave page shows a summary of your scheduled leave time. Leave time is categorized by the reason for the leave (i.e., vacation, conference, interview, sick). The last category (other) is reserved for special circumstances (e.g., bereavement). To schedule leave time, you must contact your program administrator.
Academic Sessions
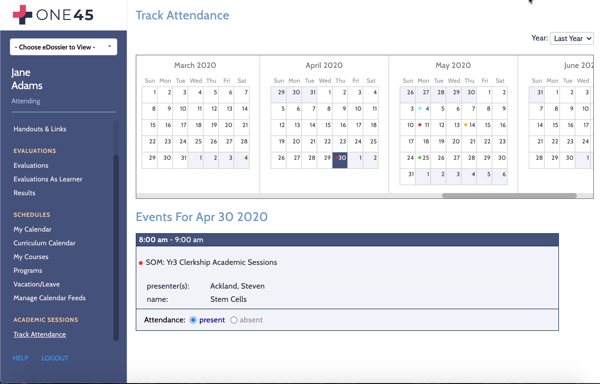
Track Attendance
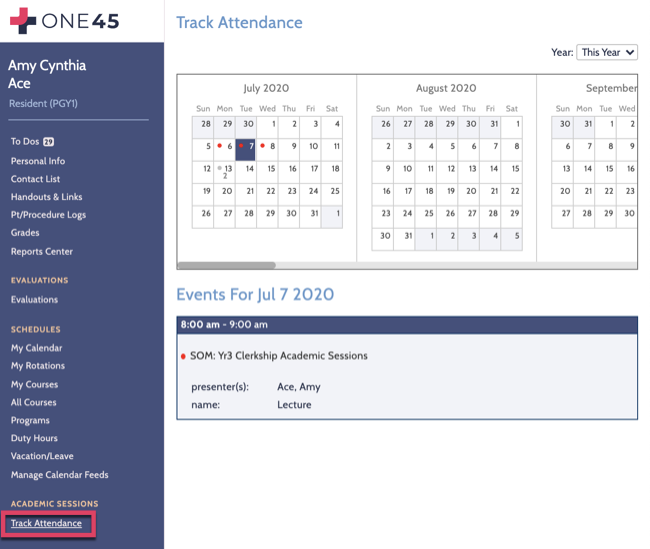
The Track Attendance page allows you to enter your attendance for academic half day sessions, journal clubs and grand rounds that have occurred in the past. The schedule sorts the academic sessions by calender months. A colored dot appears on the day an event is scheduled. If you click on the dot, the event name, topic, presenter and location are listed and you are able to access any handouts associated with the event. Beneath the details you are able to mark your attendance.
Manage Calendar Feeds
For schools that have this option enabled, you will be presented with the opportunity to sync the contents of your One45 calendar (Academic Half Day Events/Rotation Schedule/Curriculum Events) to a supported app.
For more information about this option please visit this support article: How do I subscribe to a One45 calendar?
Learners are able to quickly enter patient and procedure logs from the convenient location of their mobile device.
This feature is activated when your students log into the regular One45 website from a mobile browser. It is not an app.
How it works:
1. Users login to One45 from a mobile browser using their iPhone or Android phone.
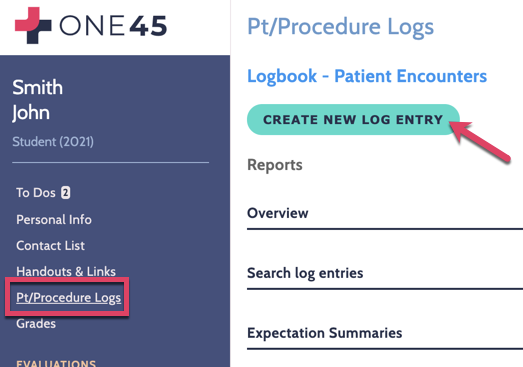
2. Tap Pt/Procedure Logs and tap CREATE NEW LOG ENTRY
3. Enter the log as you would on the desktop version.
4. Once the log entry is successfully submitted, a message will pop up. In order to view the submitted log, click OK and then on the name of the log.
If you are a student who needs to use One45 to log and track your patient and procedure logs, follow the steps below to start building your archive of log entries.
To record a patient/procedure log:
1. Log into your One45 eDossier and click on the Pt/Procedure Logs tab.
2. Click on the Create new log entry link.
3. A form containing the log questions for your program will appear. Fill in the appropriate data and click Submit when you are finished.
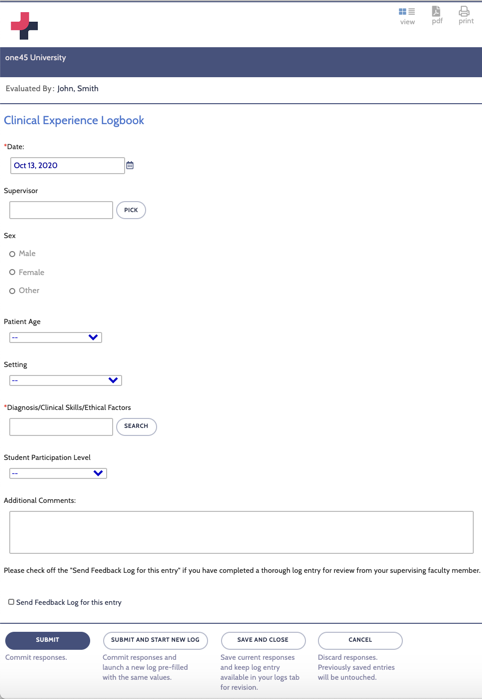
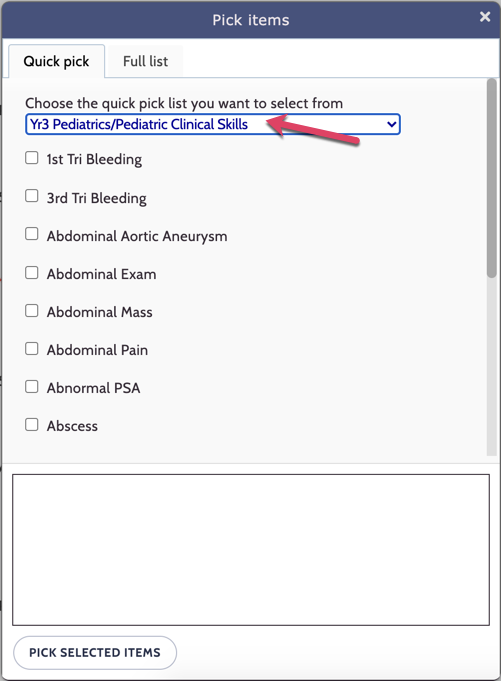
4. When choosing your Diagnosis/Procedure/Encounter etc, click Search to bring up a list of all possible items. If the option is enabled at your institution, you will see lists of requirements for each specialty. Click on the drop down menu to choose which specialty list you want to log an item for to ensure you log the correct item. You may also click on the Full list tab at the top to see the entire list of available items. Click on the checkbox next to every item that applies and click Pick selected items at the bottom of the page to submit.
Tip: to submit the current log and quickly start a new log pre-filled with the same values, click the Submit and start a new log button.
After you have started entering logs you are able to look up past items submitted and track the totals for each type of procedure completed.
To view how to summarize your overall log totals: click here
To view how to search on specific procedures tracked: click here
If you are a learner who uses One45 to log and track your patient/procedure logs, please follow the steps below to track whether you have achieved your program requirements.
To track your requirements:
1. Click on the Pt/Procedure Logs link from your eDossier account
2. Click the Expectation Summaries tab under the appropriate patient or procedure log.
3. Select the appropriate options and click the Generate summary report button.
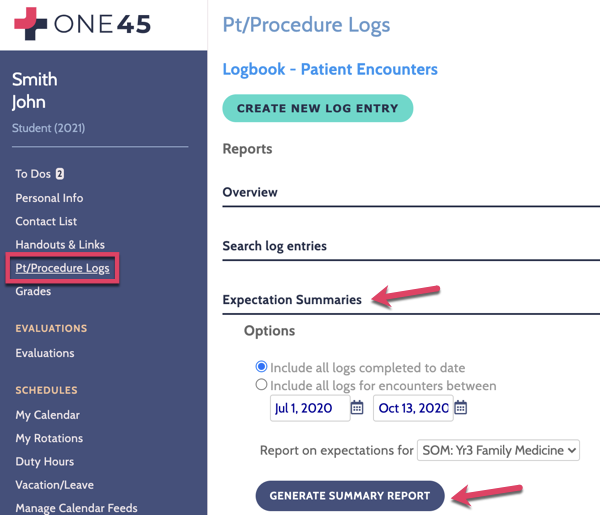
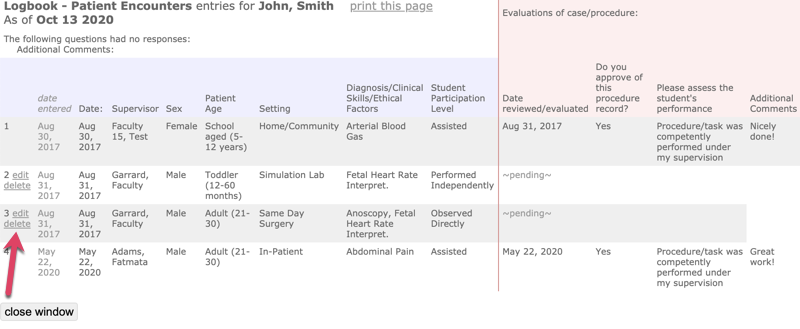
4. A new window will appear that lists the Expectation Summary Report. The report lists the requirement items, the total number of required log entries, and your achieved number of log entries.
If you have not met your requirements, the number appears in red. If you have met the requirements, the number appears in green. Click the view entries link under the number of recorded items to see which procedures/encounters have been counted towards your total.
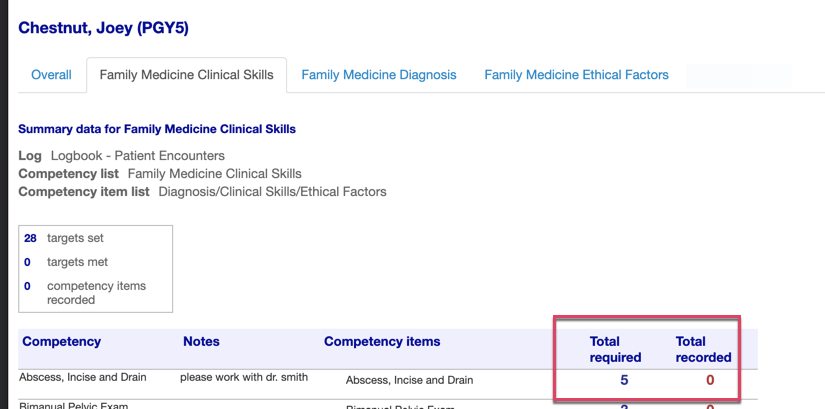
Please note: Only procedures/encounters that were logged during your time in the program (i.e. the date on your procedure/encounter must be within your rotation dates) will be counted towards your totals.
When you have to evaluate one or many supervisors, you will receive a notification email from One45. At this point, you will log into the system using your usual login information (username, password).
To choose your supervisor to evaluate (send the form to yourself):
1. Log into One45 Software.
2. Click on your To dos and check your Forms to complete. Under Target, click on the pick Attending (or pick Faculty) to open the distribution option.
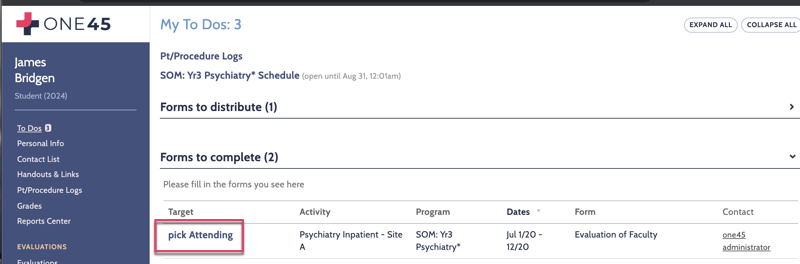
3. A list of attendings (targets) to choose from appears.
If the person isn’t in the list or no name is displayed you need to click the Add attending link
To add an attending, enter the first 3 letters of their last name and click on Search. You should get the person you need. Make sure the spelling is correct!
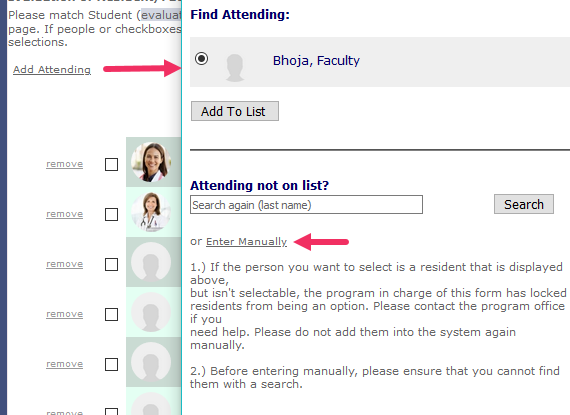
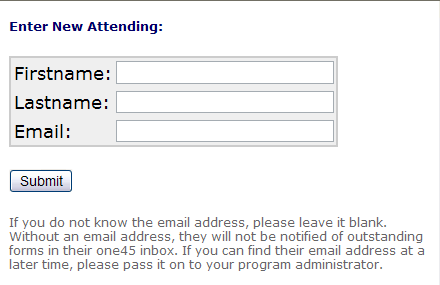
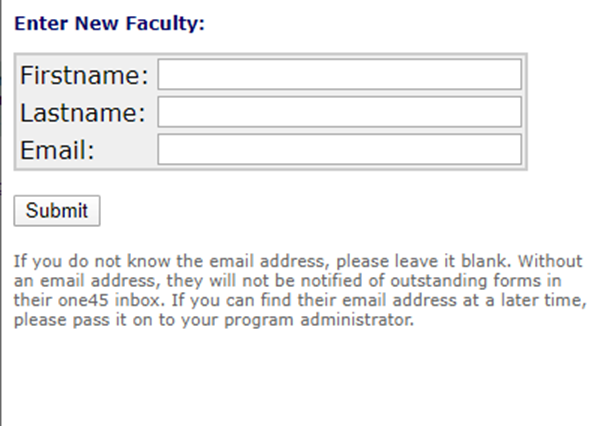
If the spelling is indeed correct and you can’t find the name, you may be able to create a new account for them (this depends on your institution’s options). In this case, click on Enter Manually and enter their name and email address:
4. Once you’ve picked your evaluator, check the box under their name and click on Send forms.
5. The system gives you a summary of who you will evaluate. You have to confirm the choices.
Click Yes, these are correct.
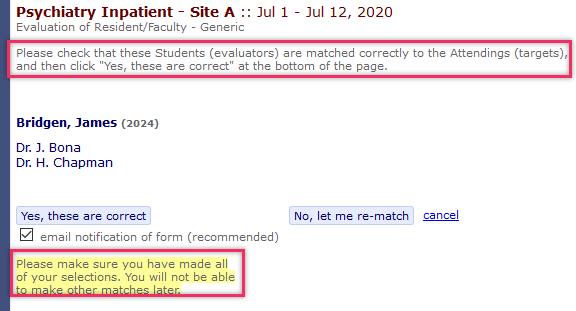
BE CAREFUL, once you have confirmed your choice you won’t be able to evaluate any other supervisor for this rotation and dates. You would have to contact your program coordinator to send more forms.
6. After confirming, you are sent back to your To Dos to complete the form(s)
To search on specific procedures tracked:
1. Click on the Pt/Procedure Logs tab in the learner’s eDossier.
2. Click on the search log entries link.
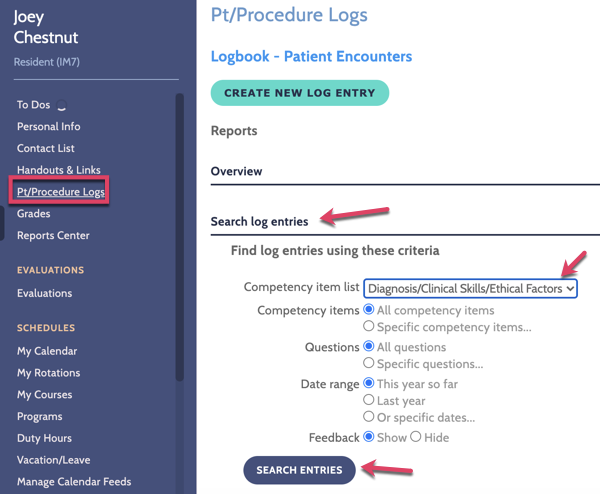
3. Select the criteria you wish to report on.
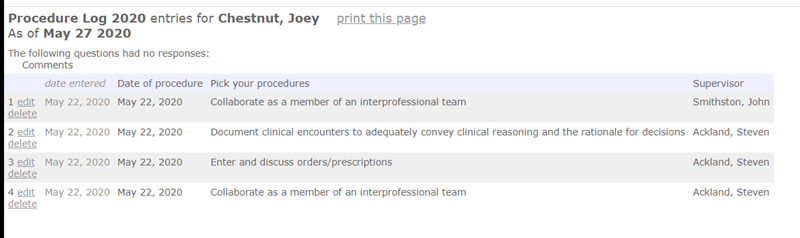
4. Click on search entries link.
A report will open which will display your log history based on the criteria chosen.
To track your duty hours:
1. Select Duty Hours from the left-menu bar of your eDossier.
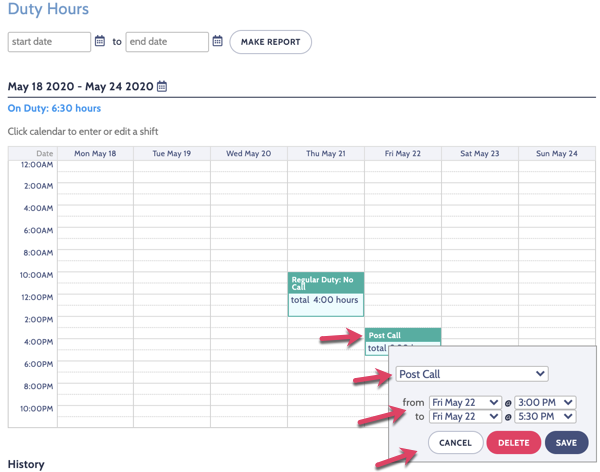
2. Click on the date you want to enter the duty hours for.
3. Click on the starting hour of the shift for the day of your shift within the weekly view section.
4. A pop up will appear for you to enter the detailed information for the shift.
5. Click on the Save button when you are done.
Above the main calendar where duty hours are entered is a reporting option (Make Report) that is only available on a desktop/laptop browser – this option will not appear when accessing duty hours from a mobile browser.
- Enter the date you’d like to report for and click Make Report to see a summary of the duty hours you’ve entered.
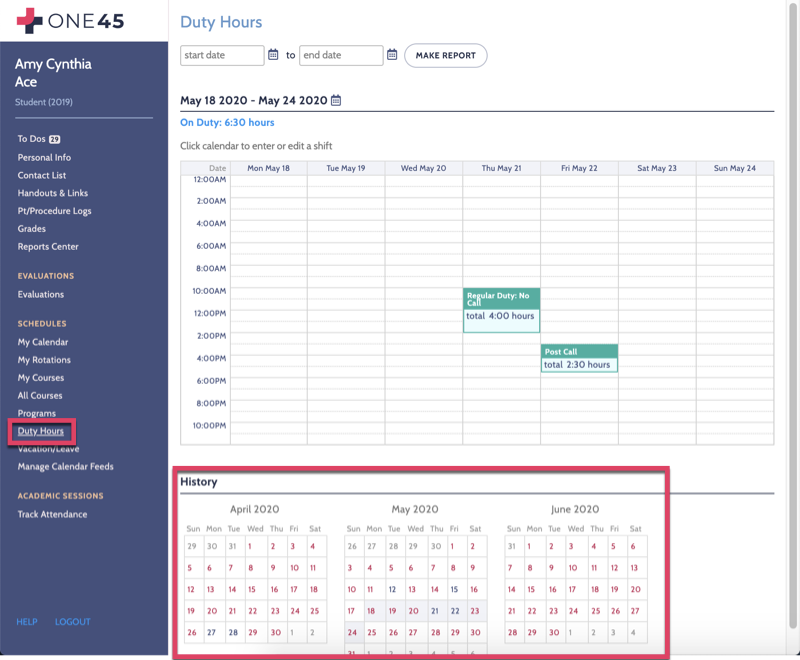
Below the main calendar where duty hours are entered there is a monthly view of shift History information, please note the following:
- Blue dates indicate shift information has been entered.
- Red dates indicate a shift has not been entered.
- The week highlighted in grey is the week you are viewing above.
Please note:
- You are not able to enter shift information for future dates
- Once a shift is entered, the page will display coloured fields with the start/end times, overall hours worked, shift type and location.
- On call shifts are displayed in green unless more than 30 hours long, where they will turn red.
- Off duty shifts are displayed in gray.
To edit an existing shift:
1. Locate the shift in question and click on it.
2. A pop up window will appear allowing you to edit the details of the shift.
3. Click on the Save button when you are done.
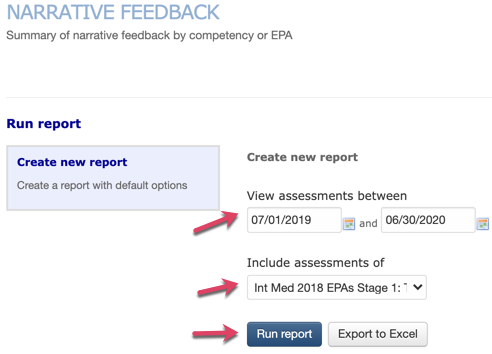
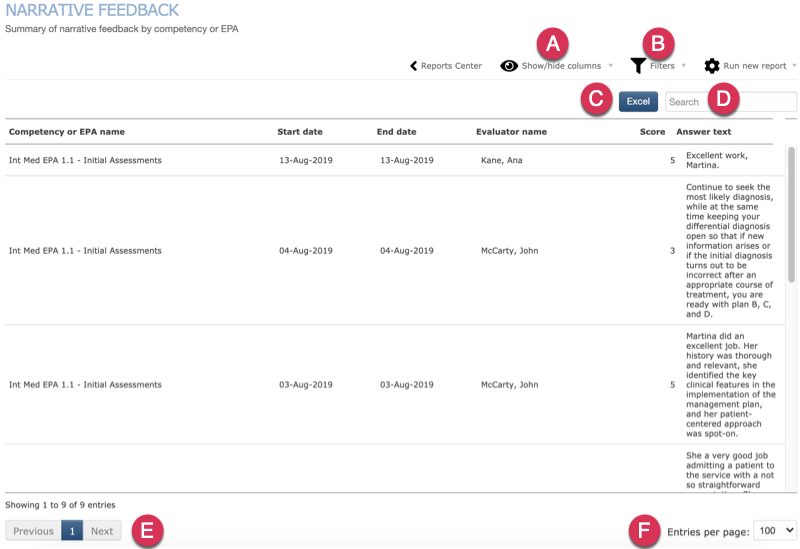
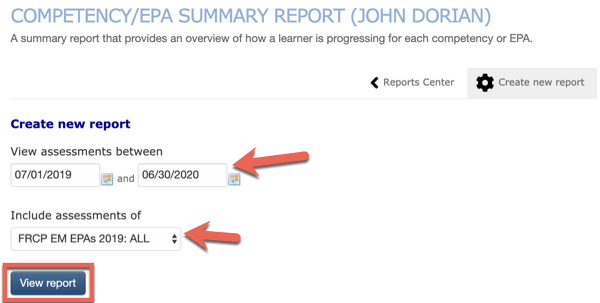
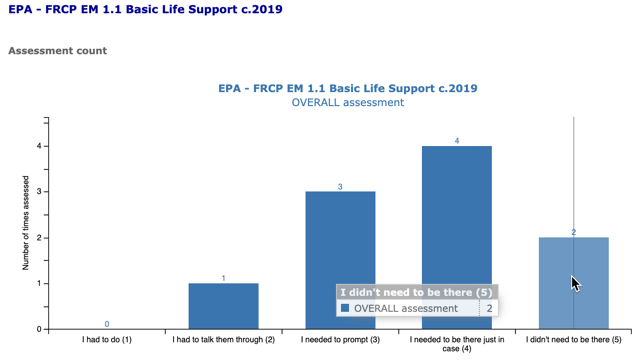
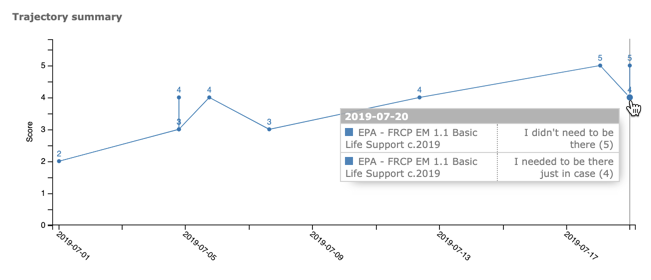
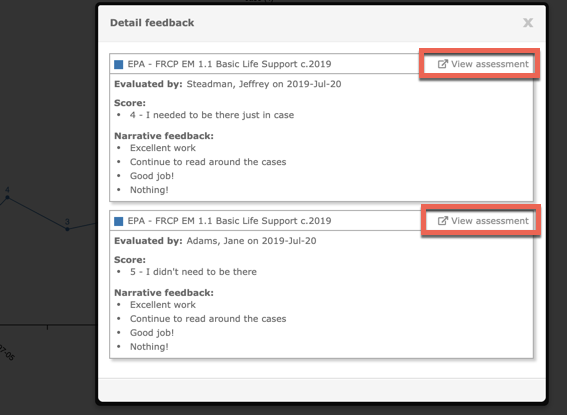
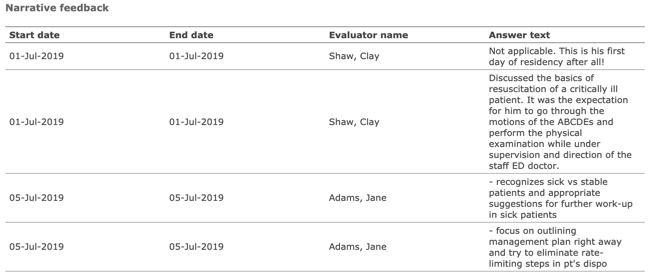
As an admin or as a learner, you’re able to see a summary of Narrative Feedback on evaluations of EPAs submitted.
Please note: this report includes the overall score for the associated EPA. This helps frame the context of qualitative feedback, as you can now see both the evaluator name and the score associated with it.
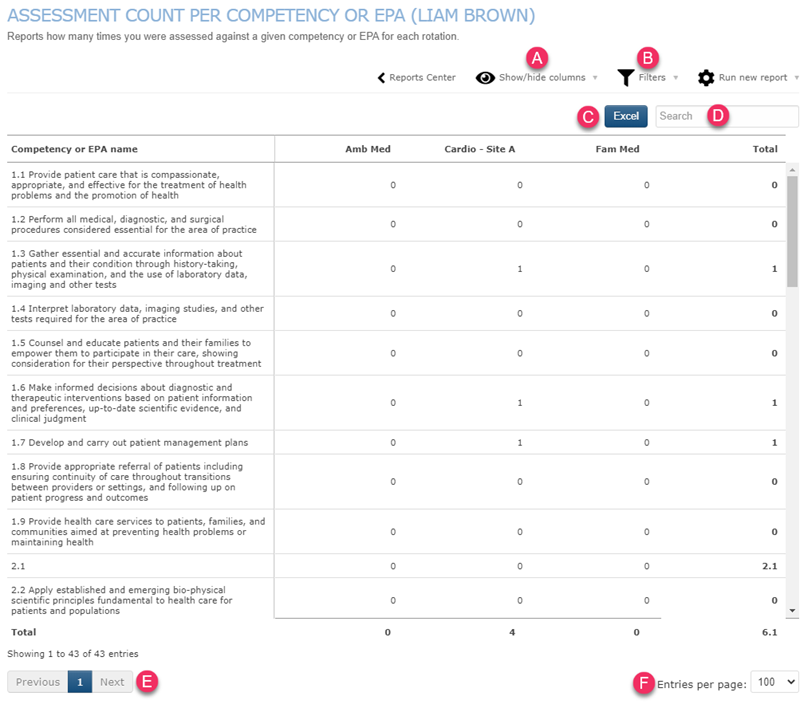
3. Once the report loads with the information you’ve requested, you are able to:

NOTE! If feedback has already been given on a procedure, it will be entirely deleted if you edit the procedure.
If you need edit or revise a procedure that has been logged, follow the steps below.
To edit a patient/procedure log:
1. Click on the Pt/Procedure Logs tab.
2. Click on the Search log entries link. 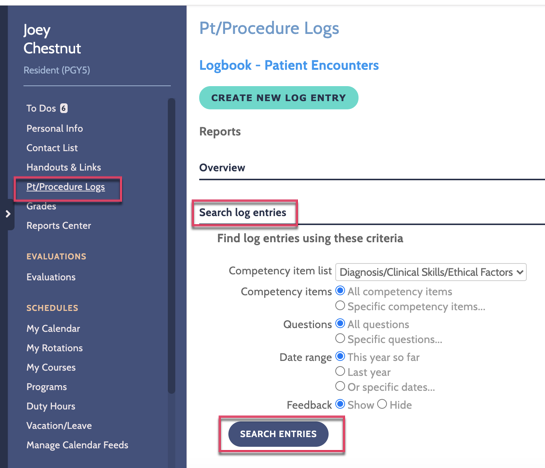
3. You can select the search details that you’d like to use to locate the procedure in question (ie. searching all or a specific procedure, date range, etc).
4. Once you have selected the search details, click Search entries when finished.
5. On the search results page, you can click on the edit link for the corresponding procedure to have it reopened.
Some programs don’t allow the editing of a procedure after feedback was given and you won’t get the option.
6. Refresh the Pt/Procedures Log page. The log you wish to edit will appear in the Logs started but not submitted list.
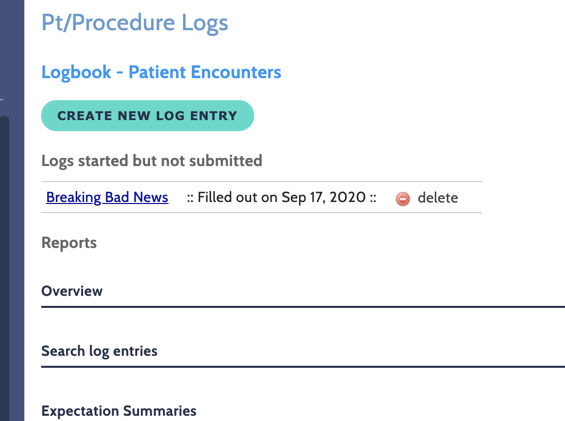
7. Click the log name to edit the log entry. When you are done, click Submit to enter the procedure back into the system.
When you have to choose your evaluator, you will receive a notification email from the system. If the email has a link to the task you can click that to access your To Dos, alternatively you can log into the system using your usual login information (username, password).
To choose your evaluator (send them a form to evaluate you):
1. Click on your To Dos and if you have Forms to distribute you’ll see them listed under the heading:
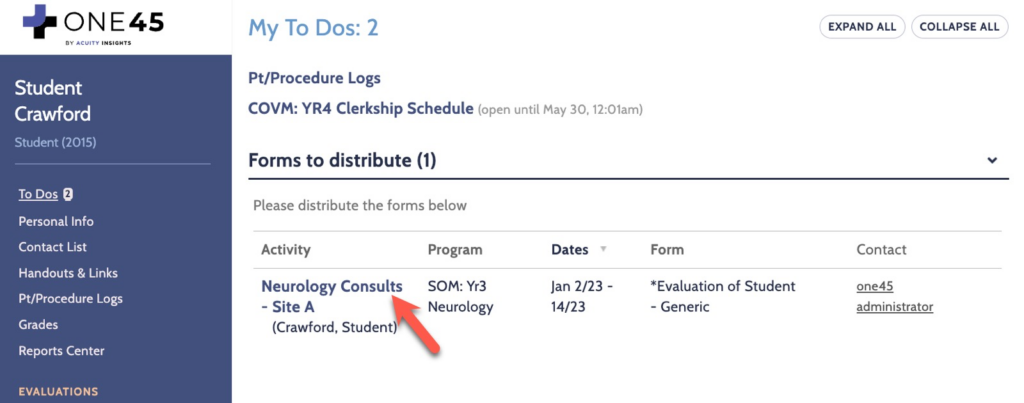
Under Activity, click on the rotation name to open the distribution option.
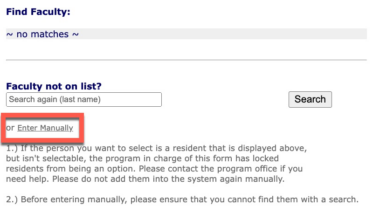
2. A list of attendings (evaluators) to choose from appears. If no name is displayed click the Add Attending/Faculty link.

To add an attending, enter the first 3 letters of their last name and click on Search.
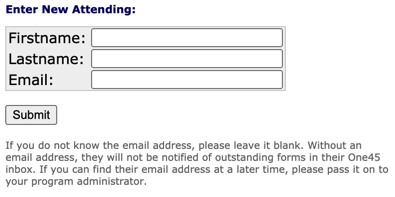
If the spelling is correct and you can’t find the name, you may be able to create an account for them (depending on your institution’s options). In this case, click on Enter Manually:
Enter their name and email address:
3. Once you’ve picked your evaluator, check the box under their name and click on send forms.
You can also use the checkboxes highlighted below to select all or select none.
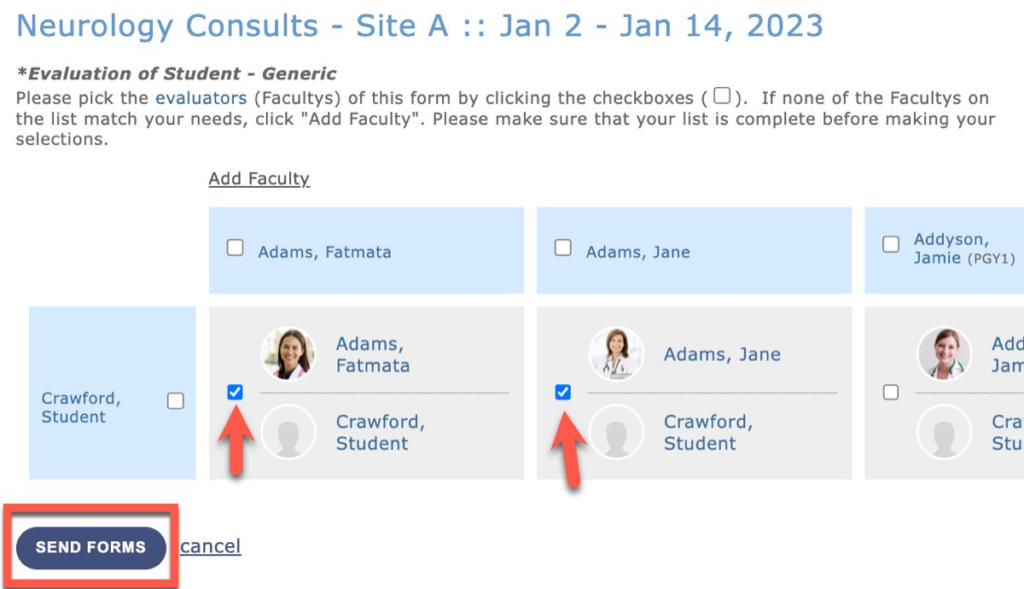
4. The system gives you a summary of whom to send forms to. You have to confirm the choices.
BE CAREFUL, once you have confirmed your choice you won’t be able to send the evaluation form to any other evaluator for this rotation and dates. You would have to contact your program coordinator.
5. Once you select ‘Yes, these are correct’, you are sent back to your To Dos.

Help for Faculty/Admins
Your eDossier has all of the important information about you and your experiences as an administrator. It is the interface through which you access the One45 system (e.g., to complete evaluations, to view rotation schedules, to change your username and password). By storing all your information in one place, the eDossier streamlines the administrative process and reduces the risk of transmission errors.
Most of the information in your eDossier can only be edited by individuals with administrative access to the system. If you’re unable to edit your own information please contact another administrator if any information needs to be updated.
Your eDossier consists of a number of pages:
To Do
The To Do page consists of the list of tasks that you have to complete. It is the page that appears when you log into the system. The most common tasks that you will perform here are trainee evaluations and distributing forms.
When a program administrator sends you an evaluation form to complete or distribute, the form automatically appears as a new task in your To Do list (usually, you also receive an email reminder with each new task). To complete a task, click on its title and follow the instructions. Once you’ve finished a task it is removed from your To Do page.
Personal Info
The Personal Info page contains your contact information and a headshot photo (if your administrator has added one to the system). It is very important that this information is kept up to date. To change any of your contact information, please contact your administrator.
This page is also where you can change your username and password. To do this, click the change username/password link. A new page appears where you can update this information.
Contact List
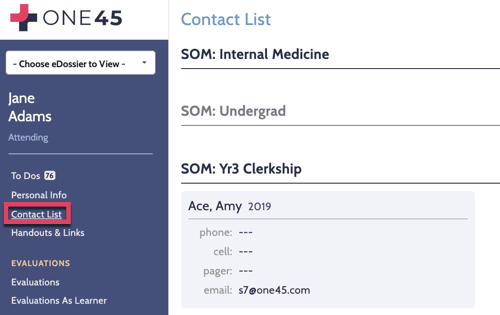
The Contact List contains phone numbers, pager numbers and email addresses for all the trainees in each of your programs. Click on the group name to view.
Handouts & Links
The Handouts & Links page contains links to the handouts and notes associated with each of the programs you are involved with. Objects are organized under three headings: Program (for objects pertaining to the entire program), Sites (for objects pertaining to specific sites within the program) and Rotations (for objects pertaining to specific rotations within the program). A few examples of learning objects are rotation objectives, reading lists, maps, websites and journal articles. You can click on the links to download personal copies or to visit specific websites.
Evaluations
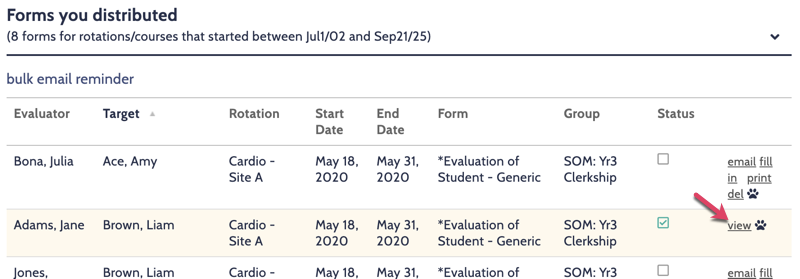
The Evaluations page is an archive of the evaluations you have completed and the forms you have distributed. These lists can be sorted by Target, Rotation, Dates or Form by clicking the appropriate heading. Admins with the general Edits permission have the ability view additional form information by using the form hound (paw). If you want to review a completed evaluation, click view beside the name of the form, this is only available for forms that are not anonymous. If you would like to complete a form, click fill in. To remind individuals to complete the forms that you have distributed to them, click bulk email reminder or on email next to the form if you want to send reminders to certain people only. You can also delete a form by clicking on del.
Schedules
The Schedule page consists of:
My Calendar: Academic Half Day events you are presenting or attending.
Curriculum Calendar: Events you’re included in within the Curriculum/Undergrad management group.
My Courses: Another view of Curriculum events you are included in.
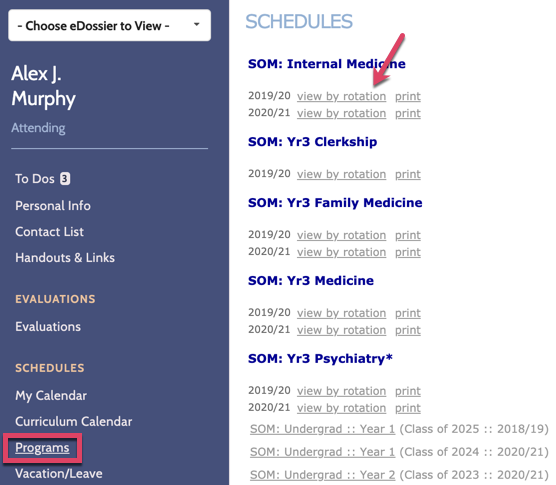
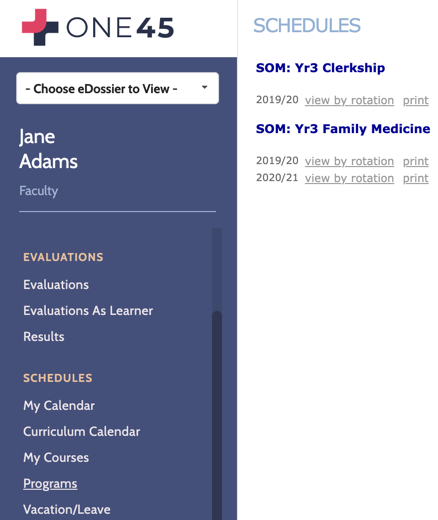
Programs: Rotation schedules for all the programs in which you are faculty. They are listed in alphabetical order. When you click view by rotation next to the academic year beneath a particular program (e.g., Yr 3 Med Clerks) the full rotation schedule for that program opens in a new window. In this manner, you can see who is scheduled to take each rotation throughout the academic year. If a trainee is scheduled for leave time during a rotation, the dates of their leave appear below the learner in grey.
You can print a copy of the schedule by clicking print next to the “view by rotation” link or the print this schedule option located in the top left hand corner of the schedule.

Manage Calendar Feeds: This allows you to create subscription links for all your date based calendar events. Please see this support resource for more information: Subscribe to a One45 calendar?
Admin Status: This page displays the groups you have access to and the permissions you have in each group.

The Curriculum Search Tool allows you to search your curriculum for a keyword, phrase or mapping. The system searches through the information in your courses and provides a list of curriculum events that have the particular keyword, phrase or mapping associated with it. Under the advanced search, you have the ability to filter your search further and add fields to your report.
To navigate to the Curriculum Search page:
1. From your eDossier, click on the My courses area. Click any portfolio or course link (it will bring you to a new page/window where you can view the details of that particular portfolio or course):

2. From this page you’re able to click on Search and be brought to an advanced search page that allows you to filter and sort across all of your curriculum/courses.
To Perform a Curriculum Search – Advanced Search:
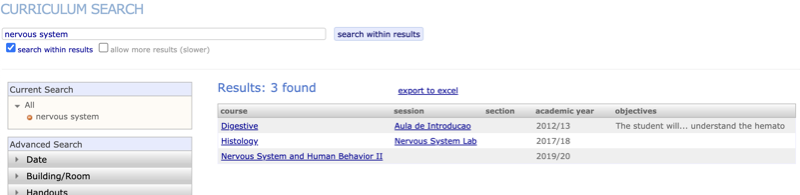
1. This Curriculum Search defaults to all your courses across all years. You’ll likely want to narrow down the search results – to do this you can conduct sub-searches and also create filters (via the advanced search options) to extract more specific data related to your keyword. The advanced search options in the left-menu bar allow you to use filters to scale down your search, in order to further narrow down the search results. With the Advanced Search option, you can also export the search results into excel.
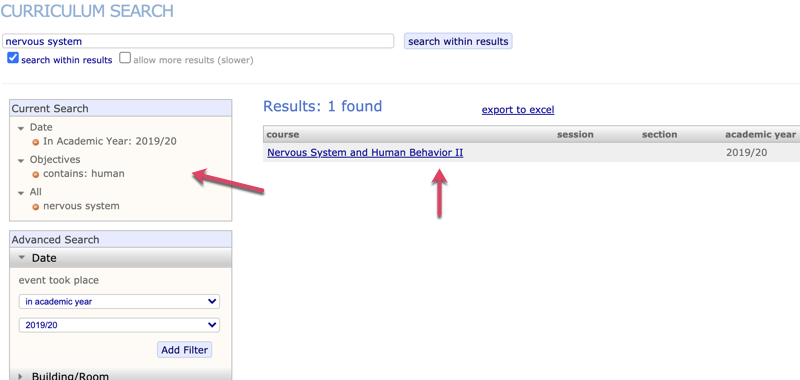
2. In the image below, two additional filters have been added: one for the academic year, and one with the objective cell. The system searched your curriculum schedule with these additional filters. By clicking the link to the course related to your keywords, you can view the details about that course.
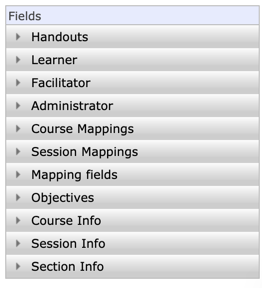
3. You can add fields to your report (ex. the course objectives, mappings, facilitators, duration, etc…) by selecting the particular field under Fields.
Supplemental:
We have added an option to get more results from your curriculum search, in case you reached the default limit of 1000 results..
By selecting ‘allow more results’ this limitation will be removed in order for you to display up to 15000 results!
Check off the box to “allow more results” and click on “search” again.

Please be aware that it may take significantly longer to get the results.
Your eDossier (or electronic dossier) is an electronic folder of important information about you and your experiences as a faculty member. It is the interface through which you access the One45 system (e.g., to complete evaluations, to view rotation schedules, to change your username and password). By storing all your information in one place, the eDossier streamlines the administrative process and reduces the risk of transmission errors.
Most of the information in your eDossier can only be edited by your program administrators.
Your eDossier consists of a number of pages:
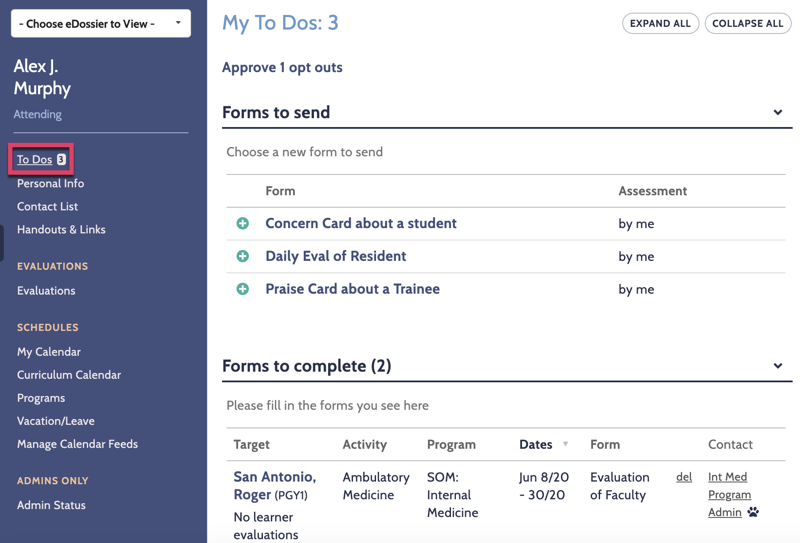
To Dos
The To Dos page consists of the list of tasks that you have to complete. It is the page that first appears when you log into the system. The most common tasks that you will perform here are trainee evaluations and distributing forms.
When an administrator sends you an evaluation form to complete or distribute, the form automatically appears as a new task in your To Do list (usually, you also receive an email reminder with each new task).
Please note that if a form has a due date listed (next to the target’s name) – this is the date the form will close and no longer be available to complete. Your institution may have an earlier date that the form should be completed by. The due date displayed is set in the form settings within One45.
To complete a task, click on it and follow the instructions. Once you’ve completed and submitted a task it is removed from your To Do page.
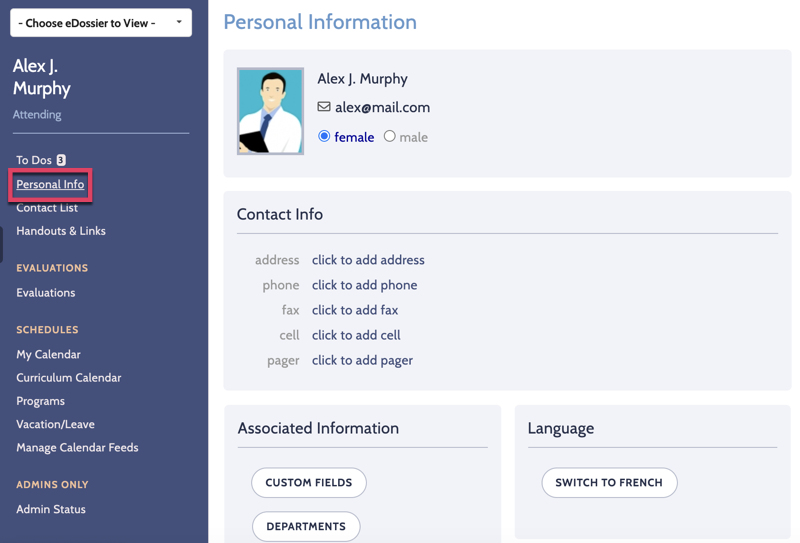
Personal Info
The Personal Info page contains your contact information and a headshot photo (if your administrator has added one to the system). It is very important that this information is kept up to date. To change any of your contact information, please contact your administrator.
This page is also where you can change:
- your language – to do this, click the Switch button under Language.
- your username and password – to do this, click the change username/password link. A new page appears where you can update this information.
Contact List
The Contact List contains phone numbers, pager numbers and email addresses for all the trainees in each of your programs.
Handouts & Links
The Handouts & Links page contains links to the handouts and notes associated with each of the programs you are involved with. Objects are organized under three headings: Program (for objects pertaining to the entire program), Sites (for objects pertaining to specific sites within the program) and Rotations (for objects pertaining to specific rotations within the program). A few examples of learning objects are rotation objectives, reading lists, maps, websites and journal articles. You can click on the links to download personal copies or to visit specific websites.
Evaluations
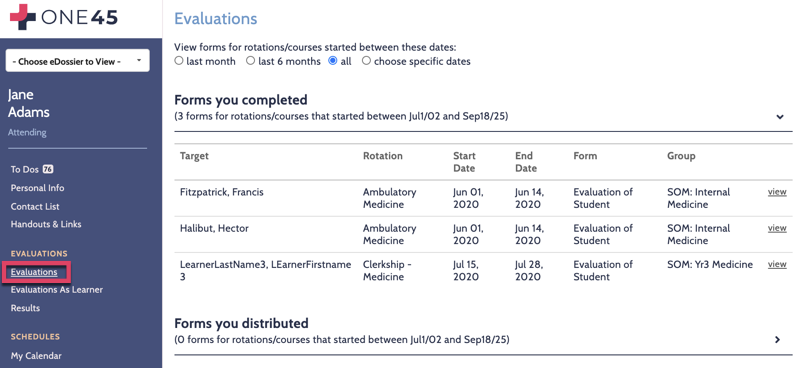
The Evaluations page is an archive of the evaluations you have completed and the forms you have distributed for the time frame indicated. These lists can be sorted by Target, Rotation, Dates or Form by clicking the appropriate heading. If you want to review a particular evaluation that you’ve completed, click view at the right of the form line.
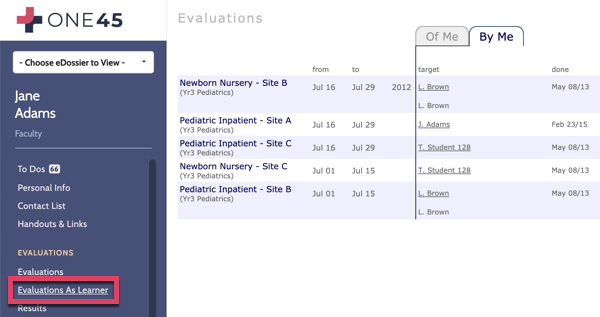
Evaluations As Learner
This page will appear in your eDossier account if you have completed evaluations as a learner prior to becoming an attending in One45. Evaluations are separated by Of Me (evaluations completed on you) and By Me (evaluations completed by you).
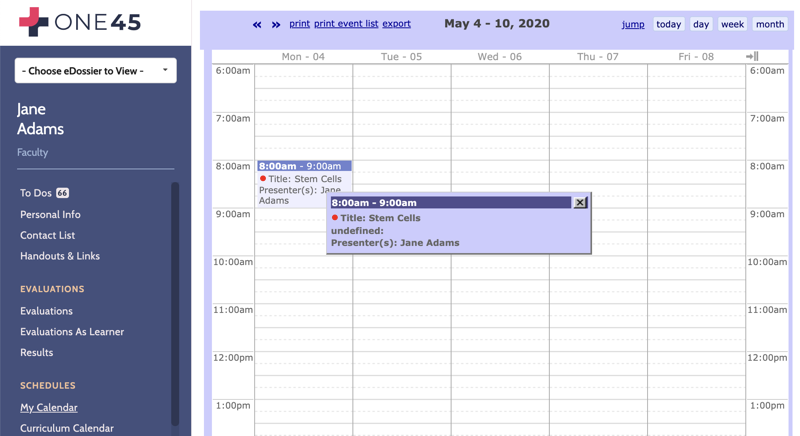
My Calendar
The My Calendar page allows you to view any academic sessions (daily events) you are expected to attend or are scheduled to present. When you click on this tab, you will be able to select a specific timeframe to view the events by selecting day, week, or month on the top right and corner. Once you have made your selection you will be able to see the events scheduled for the timeframe in the calendar below. To view the specifics of an event you must click on the event name and a box will open which displays the information such as the topic, date, speaker, and location of the item. On the top left hand corner of the page you can choose to print the calendar or export it to another calendar system that you regularly use such as Outlook.
Curriculum Calendar
The Curriculum Calendar page consists of the lecture schedules for all the student programs in which you are faculty. They are listed in alphabetical order. When you click a particular program (e.g., Undergrad) on the left hand side, a calendar with the lectures for that program appears on the right. When you click on this tab, you will be able to select a specific time-frame to view the events by selecting day, week, or month on the top right hand corner. Once you have made your selection you will be able to see the events scheduled for the time-frame in the calendar below. To view the specifics of an event you must click on the event name and a box will open which displays the information such as the topic, date, speaker, and location of the item. On the top left hand corner of the page you can choose to print the calendar or export it to another calendar system that you regularly use such as Outlook.
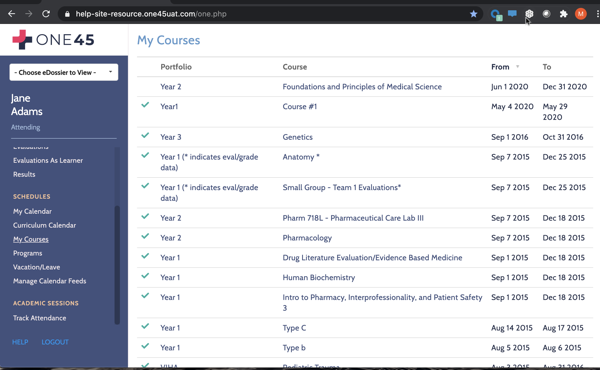
My Courses
The My Courses page lists all Undergrad courses you are attached to.
Programs
The Programs page consists of the rotation schedules for all the programs in which you are faculty. They are listed in alphabetical order. When you click a particular program (e.g., Undergrad), the full rotation schedule for that program appears on the right. In this manner, you can see when each trainee is scheduled to take each rotation throughout the academic year. If a trainee is scheduled for a leave during a rotation, the dates of their leave appear in italics. You can print a copy of the schedule by clicking excel view (for printing).
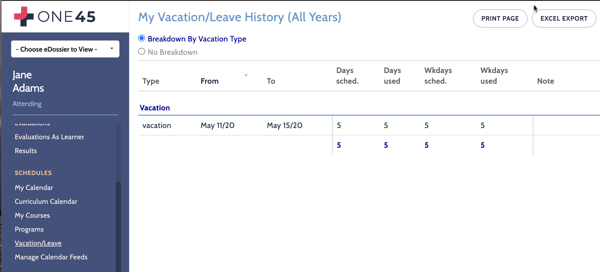
Vacation/Leave
The Vacation/Leave page shows a summary of your scheduled leave time. Leave time is categorized by the reason for the leave (i.e., vacation, conference, and interview). To schedule leave time, you must contact your program administrator. You can export your vacation summary in an excel file by clicking on the excel export link or to print it by clicking on the print page link.
Manage Calendar Feeds
For schools that have this option enabled, you will be presented with the opportunity to sync the contents of your One45 calendar (Academic Half Day Events/Rotation Schedule/Curriculum Events) to a supported app.
In your eDossier click on Manage Calendar Feeds under Schedules. If you haven’t already done so, click on Generate subscription URL.
Once a URL has been generated, copy the URL and follow the tool or device-specific instructions given on this page to subscribe to the calendar URL.
Please note that the calendar is not a ‘push feed’ and requires reoccurring synchronisation of the app in use.
Track Attendance
The Track Attendance page allows you to enter your attendance for academic half day sessions that have occurred in the past. The schedule sorts the academic sessions by calendar months. A coloured dot appears on the day an event is scheduled. If you click on the dot, the event name, topic, presenter and location are listed and you are able to access any handouts associated with the event. Beneath the details you are able to mark your attendance.
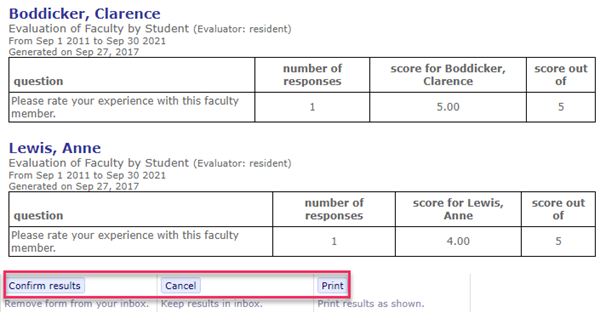
In most cases, evaluations on faculty are considered anonymous. Your program administrator and director will likely manage when and how your evaluation results are released. They can either be released to you in printed form and shared during an in-person meeting, or, they can be shared electronically via One45.
When the One45 system sends you notification that your evaluation results are ready for viewing, simply click on the link contained in the email and it will take you directly to your ToDo page where the report can be found.
1. The email notification will read as follows:
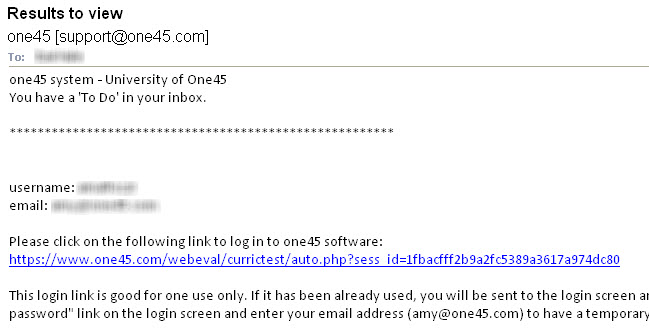
2. Once you click the link in the email, it will take you to your To Do list where you can locate the report. See sample below:
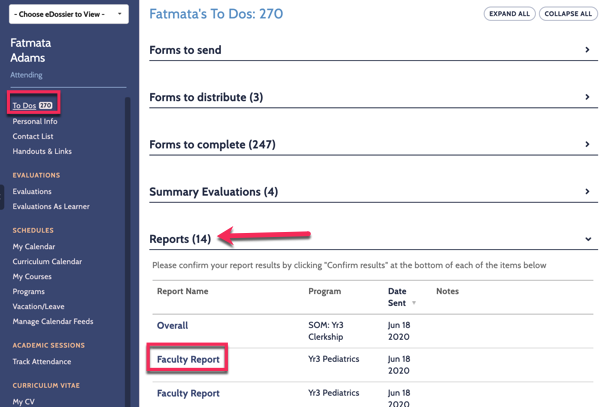
3. From there, you can open the report, view your results, and make comments, if required.
Note the following:
– The num responses column represents the total number of times that specific question was answered.
– The score column represents your average score on that question
– The out of column represents the max value of that particular question
The Rotation eDossier is an electronic folder of which contains important information about the rotations you are involved with.
To view the rotation eDossier, select the rotation you wish to view via your eDossier by using the drop-down box in the top-right hand corner.
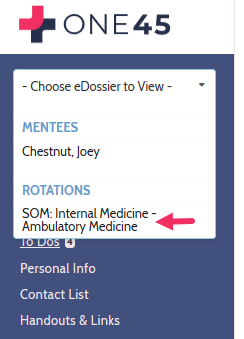
After you have selected the rotation name the Rotation eDossier will appear and your personal eDossier account will be hidden from your view. The tabs that you see in the rotation eDossier account may differ depending on what the Program Administrator has given you access to view.
If you feel that you are missing a tab that you should have access to view contact the main program administrator.
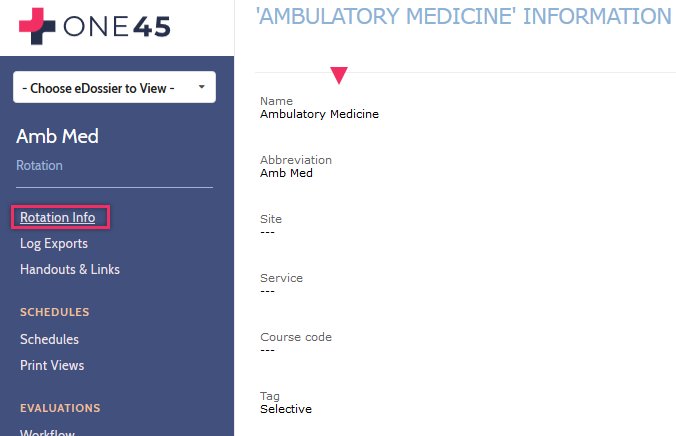
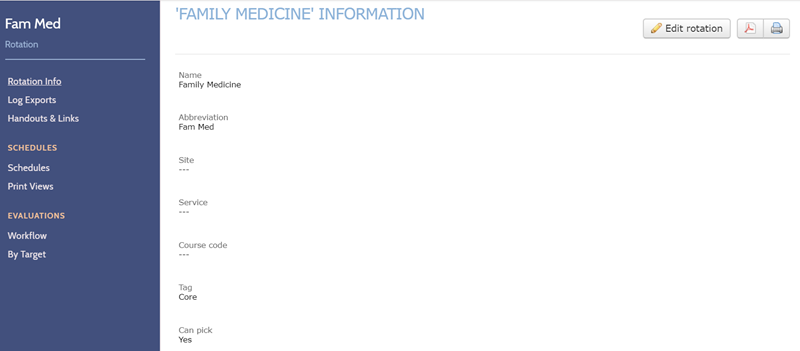
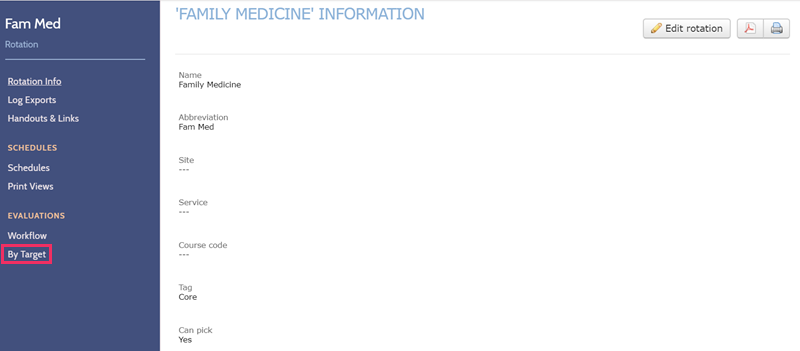
Rotation Info:
The rotation info tab contains the naming information for the rotation such as how it has been abbreviated for schedules, the site info, etc.
Log Exports:
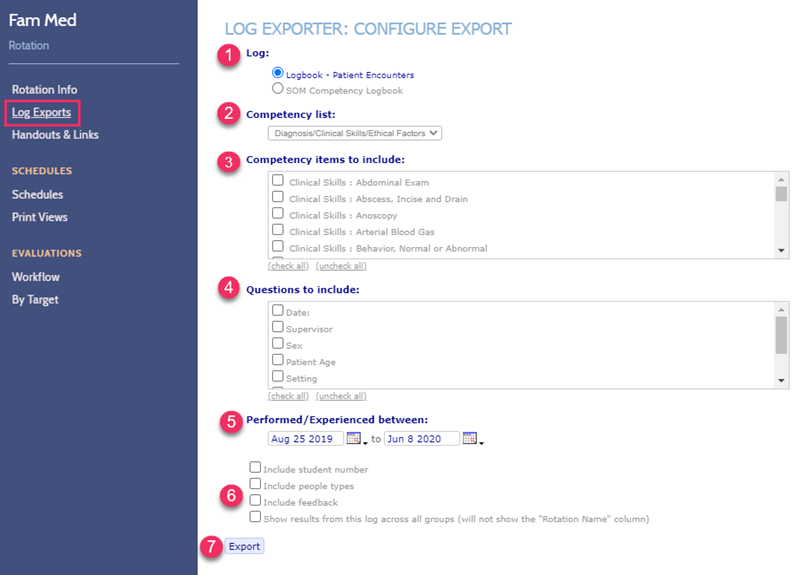
The Logs Exports page will allow you to pull reports on the total numbers and types logs are getting recorded for your particular rotation. Not all programs track patient/procedure logs so this tab may not be visible for you.
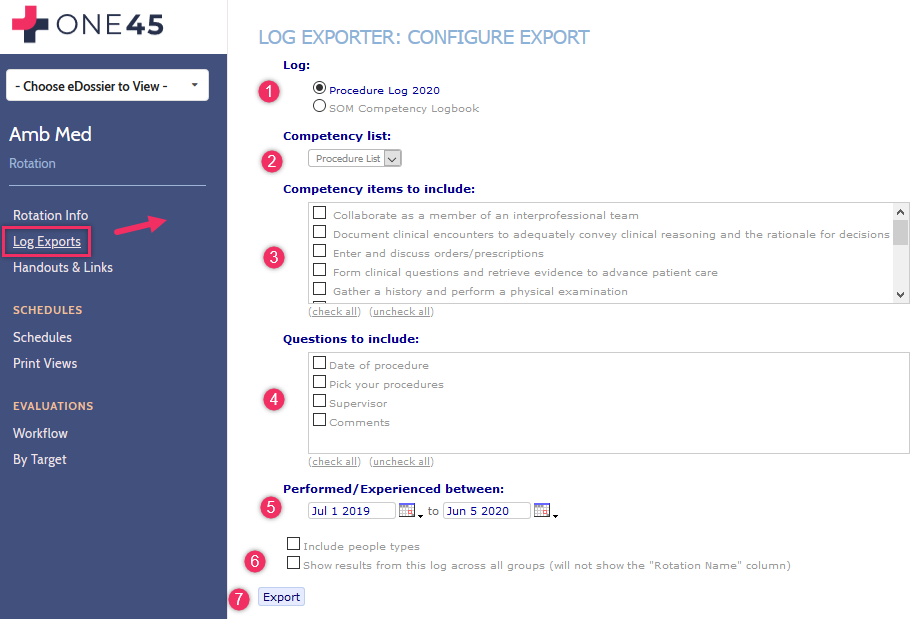
To pull a log report/export:
1. Select the type of log you wish to report on. Many programs will only have one option within this section
2. Select the Competency List if you have more than one set up
3. Select the tasks/procedures/diagnoses to include. Click on ‘all’ to report on all items that have been tracked or individually click on items within the list to look at individual experiences.
4. Select which questions you wish to include. Click on ‘all’ to report on all items that have been tracked or individually click on items within the list to look at individual experiences.
5. Select the date range for the report.
6. If you wish to include people types and show all log filed on the report check the boxes.
7. Click Export to view the report.
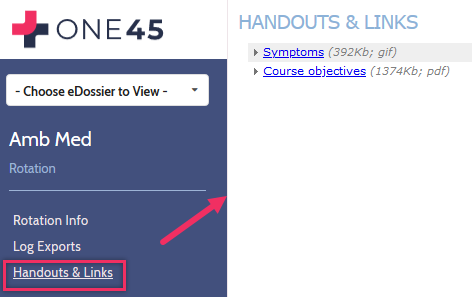
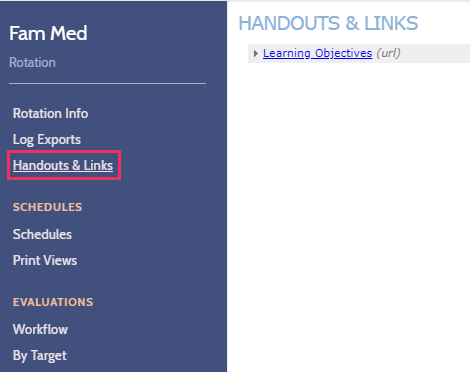
Handouts & Links:
The handouts and links section allows you to view all reading materials and URL links for the rotation. If any items for your rotation are missing please forward the information to the main administrator and they will upload the documents into the system.
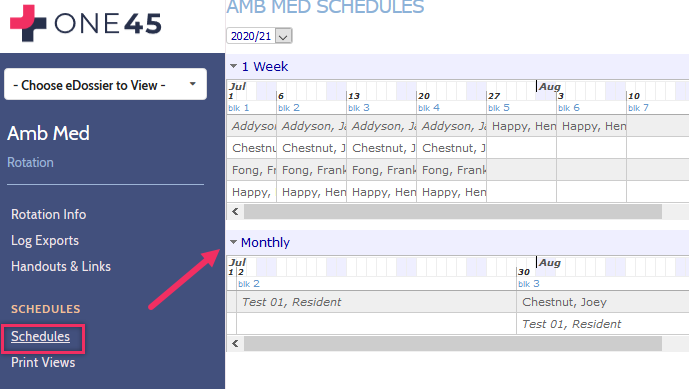
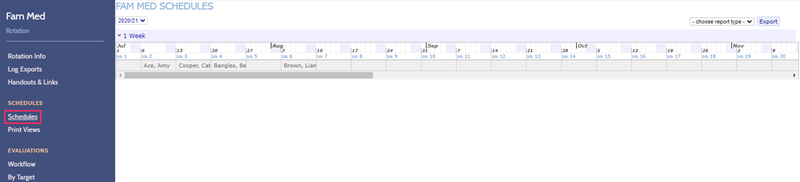
Schedules:
The schedule tab will allow you to view when students are rotating on your service. This information will be automatically updated by the program administrator as students are added or removed from the rotation.
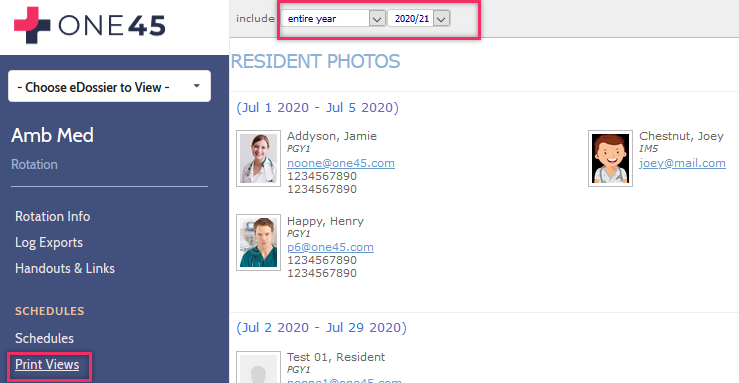
Print Views:
Use the top options to export or review who the learners are that are coming to this rotation, for certain dates. You can see their names, photos, email address and phone number
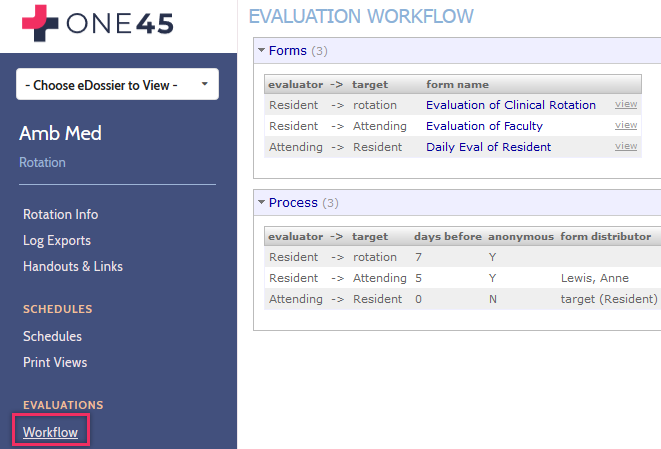
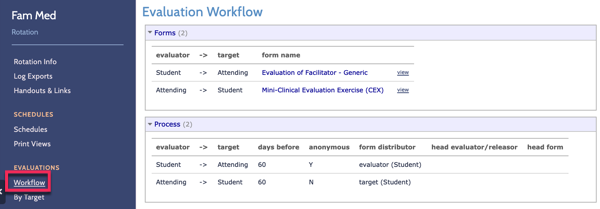
Evaluation Workflow:
Forms – The forms page allows you to view blank copies of the evaluations that are being used for the rotation.
Process – The process section will allow you to review how the evaluations are set up for the rotation. If any forms are missing or if the form setup needs to be updated please contact the program administrator and let them know the specific requirements for your rotation.
Reports – By Target:
Reports by Target is the most common way of generating reports in One45. Reports are organized by the target of the evaluation. You are able to select a certain student, resident, attending or rotation and pull up all evaluations completed on that target for a particular time frame. If the forms that were completed are the same, you are also able to combine the results on one report.
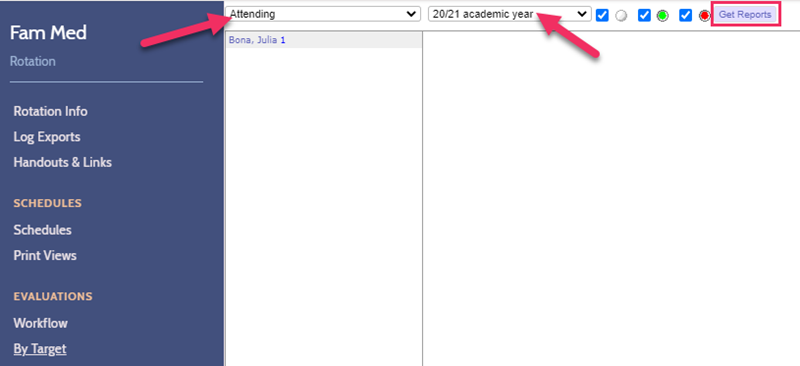
To generate a report on a particular target:
1. Click the By Target tab.

2. Under Evals of… select the role of the target.
3. Select the date span that you would like to report on. This year start so far is selected as a default which pulls up all evaluations completed during the current academic year.
4. Click Get Reports.
5. Click on the name of the target that you would like to view a report on.
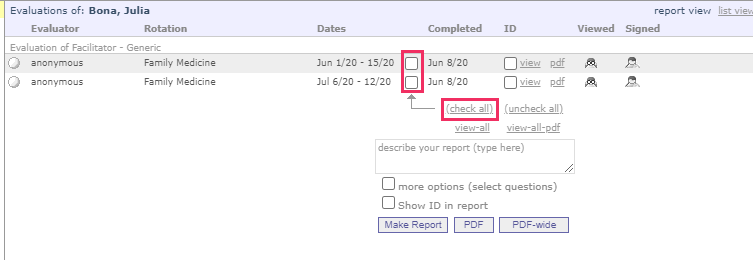
6. The completed evaluations are displayed on the right organized by form.
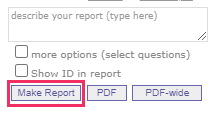
7. To generate a combined report, select the checkboxes in between the rotation dates and the completed dates or alternatively you are able to click on the ‘check all’ link
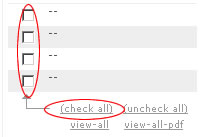
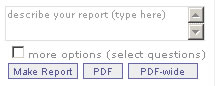
8. Describe your report in the box (or the rotation dates) and click Make Report. If you would like to select only certain questions to be shown on your report, select ‘more options’.
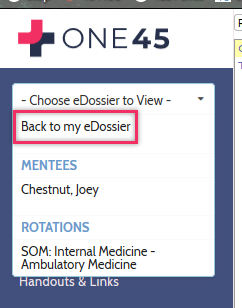
Switching back to your own eDossier:
To switch back to your own eDossier you must click on the Choose eDossier to View dropdown on the top of the page and then click Back to my eDossier
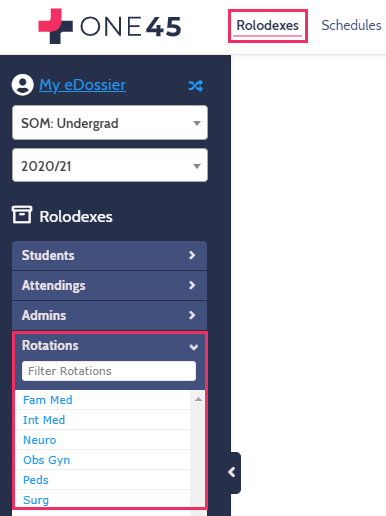
The Rotation eDossier is an electronic folder of which contains important information about the rotations in your group.
To view the rotation eDossier, click Rolodexes, open the Rotations rolodex and click on the rotation you would like to view.
Rotation Info:
The rotation info tab contains the naming information for the rotation such as how it has been abbreviated for schedules, the site info, etc.
You can edit, print, and export the rotation information from this page if you have the permission to manage rotations.
Log Exports:
The Logs Exports page will allow you to pull reports on the total numbers and types logs are getting recorded for your particular rotation. Not all programs track patient/procedure logs so this tab may not be visible for you.
To pull a log report/export:
1. Select the type of log you wish to report on. Many programs will only have one option within this section.
2. Select the competency list you would like to report on. Many programs will only have one option within this section
3. Select the competencies/procedures/diagnoses to include. Click on all to report on all items that have been tracked or individually click on items within the list to look at individual experiences.
4. Select which questions you wish to include. Click on all to report on all items that have been tracked or individually click on items within the list to look at individual experiences.
5. Select the date range for the report.
6. Check any of the check boxes you wish to include on the report.
6. Click ‘Export’ to view the report.
Handouts & Links:
The handouts and links section allows you to view all reading materials and URL links for the rotation. If any items for your rotation are missing please forward the information to the main clerkship administrator and they will upload the documents into the system.
Schedules:
The schedule tab will allow you to view when students are rotating on your service. This information will be automatically updated by the program administrator as students are added or removed from the rotation
.
Evaluation Workflow:
Forms – The forms page allows you to view blank copies of the evaluations that are being used for the rotation.
Process – The process section will allow you to review how the evaluations are set up for the rotation. If any forms are missing or if the form setup needs to be updated please contact the program administrator and let them know the specific requirements for your rotation.
Reports – By Target:
Reports by Target is the most common way of generating reports in Altus. Reports are organized by the target of the evaluation. You are able to select a certain student, resident, attending or rotation and pull up all evaluations completed on that target for a particular time frame. If the forms that were completed are the same, you are also able to combine the results on one report.
To generate a report on a particular target:
1. Click the By Target tab.
2. Under ‘Evals of…’ select the role of the target.
3. Select the date span that you would like to report on. This year start so far is selected as a default which pulls up all evaluations completed during the current academic year. Click Get Reports.
4. Click on the name of the target that you would like to view a report on.
5. The completed evaluations are displayed on the right organized by form.
6. To generate a combined report, select the check boxes in between the rotation dates and the completed dates or alternatively you are able to click on the check all link
8. Describe your report in the box. If you would like to select only certain questions to be shown on your report check off more options, and you can check off show ID in report include the ID if you would like. Click Make Report.
Faculty and admins may receive notifications if their department has decided to flag low performance on evaluations forms.
Altus software sends them an automated email notification inviting them to log into their account and take a look at the low performance that has been flagged. You can customize the body of this email through the Setup > Email messages page.
To view and sign off on the discussion triggered by a low performance flag:
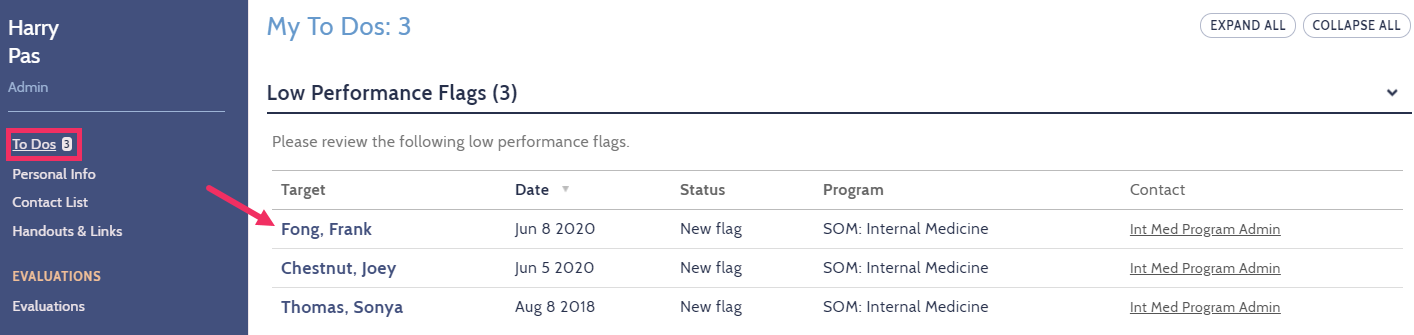
1. Log into your One45 account and wait for your To Dos page to open.
2. You will find the Low Performance Flags on this page.

3. Click on the name of the target of the evaluation to open the discussion feature with the flagged evaluation attached.
4. Either comment and/or forward to another individual.
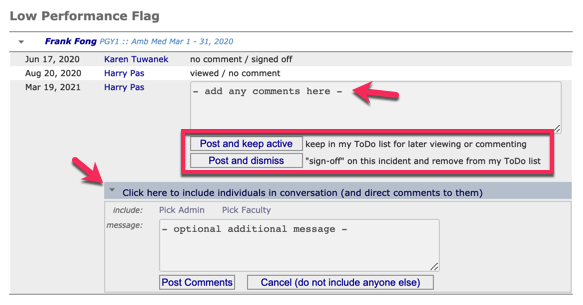
You are then able to keep this notification active for further commenting or you can sign off and dismiss it to have it removed from your To Dos.
Can users sign off on their active flags in bulk? Unfortunately, Altus does not have any bulk sign off capabilities for low perfomance flags; each flag must be signed off individually.
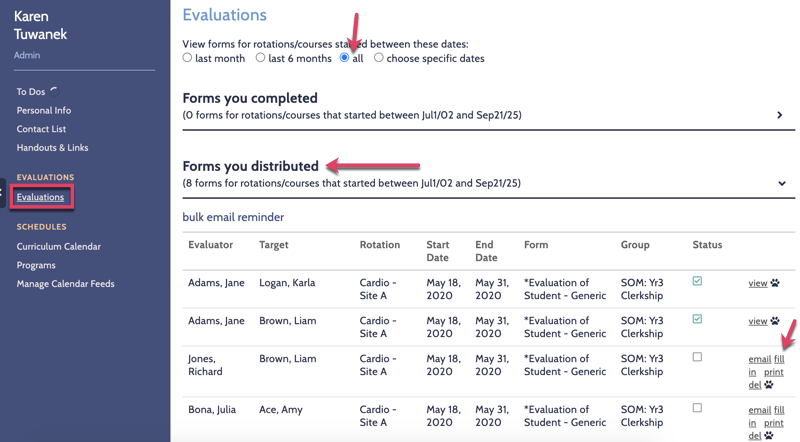
After evaluations are distributed the can be tracked through the evaluations tab.
To view the evaluations:
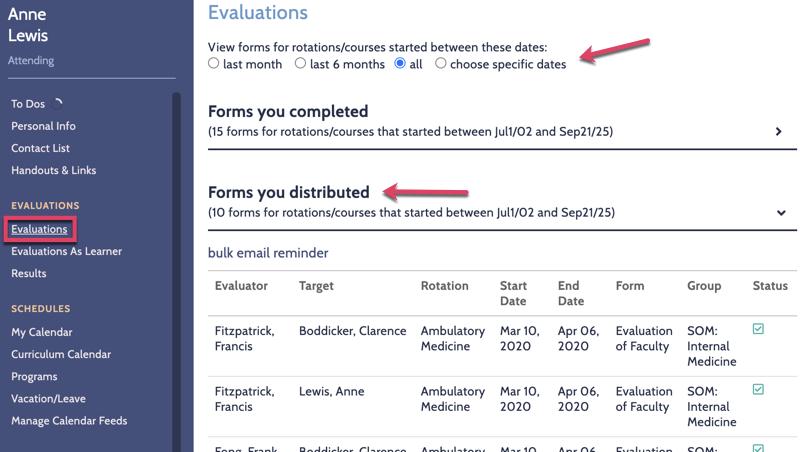
1. Click on the ‘Evaluations‘ tab in your eDossier.
2. Select the date range at the top for which you wish to track/view the evaluations. For quick search options select the radio button beside ‘last month, last 6 months, or all’.
3. Click on the line ‘Forms you distributed’ to access/track the evaluations.
Permissions regarding the evaluations need to be set-up with the One45 representative. If you do not see any of the options listed below and require then please contact the main program administrator who can contact their One45 representative to have this feature turned on for you.
Tracking Features (on the right of each line):
Status – Track whether the forms have been completed (a checkmark indicates that a form has been done).
View – Click on this link to see the completed evaluation. To print off completed evaluations click ‘file ‘print’ on the top of the page after clicking on the ‘view’ option.
Email – This feature allows you to send personalized email reminders to individual evaluators.
Fill in – This feature allows you to transcribe the evaluation on behalf of another evaluator. This feature should be used if you are given a printed copy of an evaluation that needs to be entered into the system.
Print – The print link will open a blank paper copy of the evaluation form to fax/handout to evaluators who do not have computer access. When a paper copy is received you can transcribe the information into the system on behalf of the evaluator (if the option is turned on).
Bulk Email Reminder (above Evaluator names)- This feature allows you to send personalized email reminders to the all evaluators with outstanding forms.
If you need to send the low performance flag to someone else to review, you can easily forward it:
1. In your eDossier’s To Do list, click on the low performance flag you’d like to forward:
2. On the Low Performance Flag screen, click on the (‘Click here to include individuals in conversation (and direct comments to them‘) button.

3. Click on the Pick Admin or Pick Faculty links:
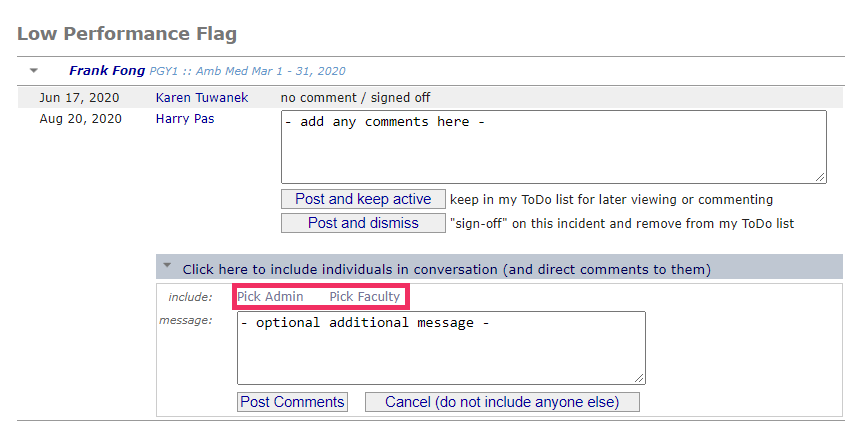
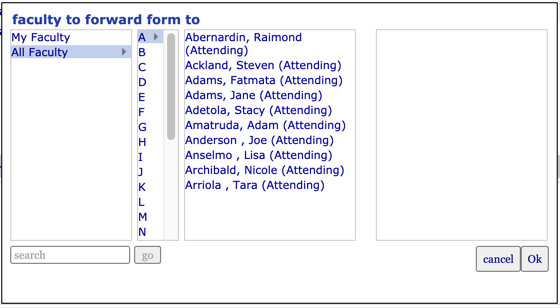
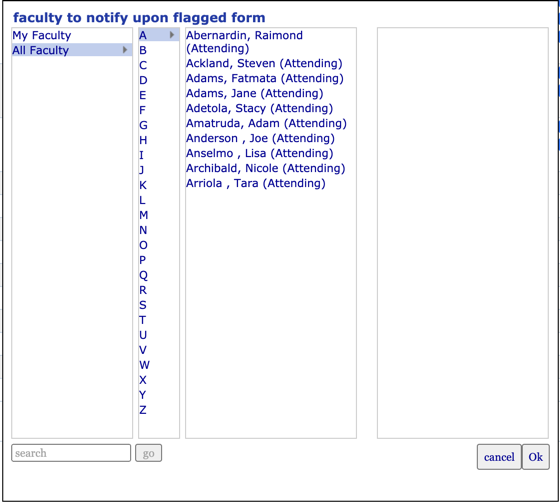
4. Select the names of the corresponding admin or faculty member that you would like to forward the low performance flag to. A People Picker appears. In the People Picker, choose the individuals and click the Ok button.
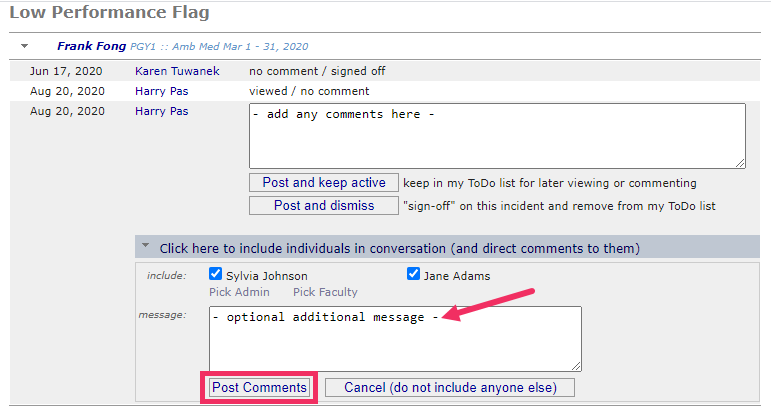
5. You can include an optional additional message anc once completed, click on the Post Comments button.
6. The flag will now be forwarded to the intended person and appear in that person’s To Do list.
You can set up admins or faculty members that you may need to be forwarded low performance flags within the setup of the low performance flags to increase the efficiency.
To create a list of additional individuals who are likely to be included in the discussion and follow-up of a low performance:
1. Click Forms.
2. Click Low Performance.
3. Click Flags Set-up.
4. For the corresponding evaluation, click the + sign under Forward QuickPick.
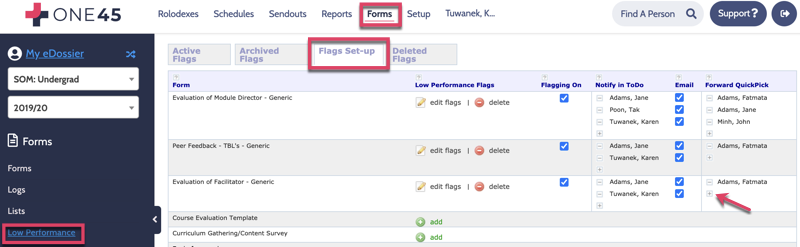
If the individuals are administrators, click admin. If they are faculty, click faculty.
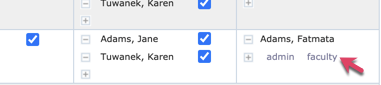
In the People Picker that appears, choose the individuals and click the Ok button. Their names will appear in the Forward QuickPick list.
At times you may receive paper evaluations from the faculty you have sent the evaluations. When this occurs you will then need to transcribe this evaluation into the system. To do this you will need to go to your evaluations tab and locate the evaluation.
To transcribe evaluations into the system:
1. Click on your Evaluations tab.
2. Select the date range at the top for which you wish to track/view the evaluations. For quick search options select the radial button beside last month, last 6 months, or all.
3. Click on the line Forms you distributed to access/track the evaluations.
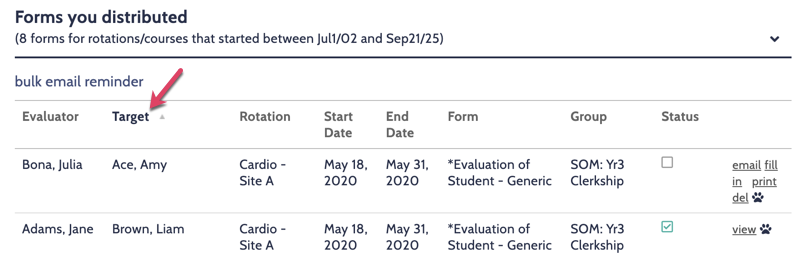
4. Locate the form in the list and click on fill in to submit the evaluation.
If you have trouble locating the evaluation you can sort the items by clicking on the headers at the top. For example, you can click on Target to sort alphabetically by the target name (the resident or student who is getting evaluated).
After you have clicked on the fill in option a blank copy of the evaluation form will open for you to transcribe the information from the paper evaluation into the system.
5. Transcribe the information from the paper form and click ‘submit’ to save the evaluation into the system. This will remove the outstanding form from the evaluators inbox and save the data into the system.
6. To access the completed evaluation after it has been completed click on view on the right hand side of the page.
A form distributor is an individual who is involved in facilitating the evaluation process for a particular rotation. As a form distributor you are responsible for making sure the correct evaluators receive the forms to complete on students/residents as they rotate through your service.
When there are forms for you to distribute you will receive an email notification from the system. At that time you are required to log in and the evaluations you need to distribute will automatically appear as a new task in your To Do list.
To complete a distribution:
1. Click on the blue highlighted rotation name in your To Dos tab, under Forms to distribute:
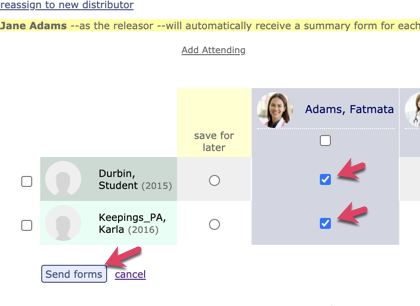
2. A list of the residents/students who rotated on the rotation for the given time frame will appear with a list of faculty to the top right of the student/resident names.
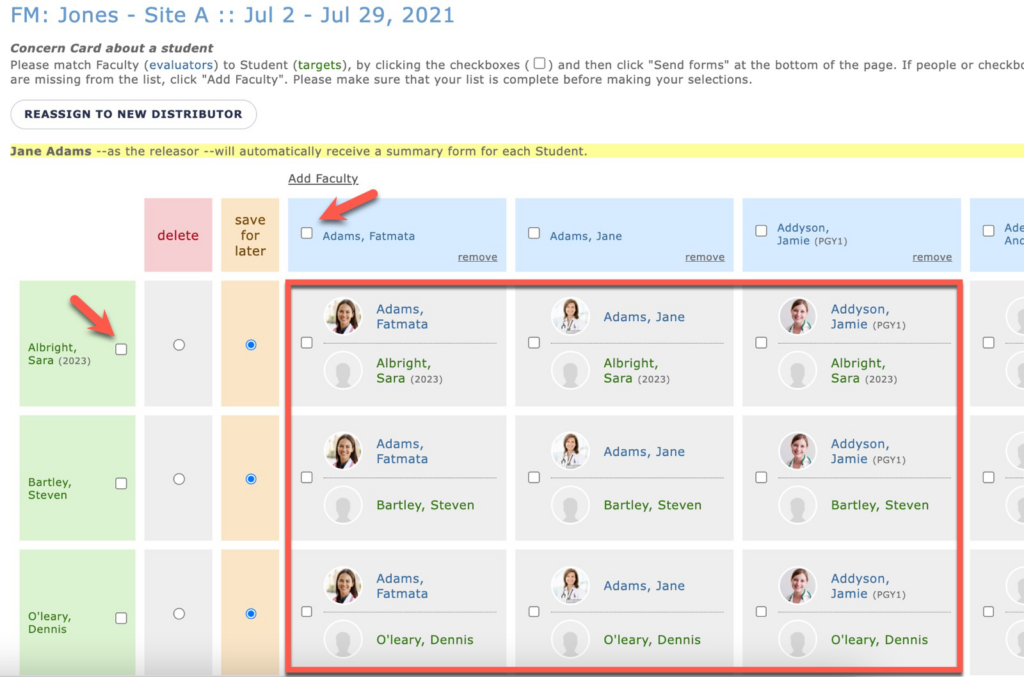
You can use the checkboxes highlighted by the arrows above to select all or the ones highlighted in the box to select each individually.
3. Select the Evaluators
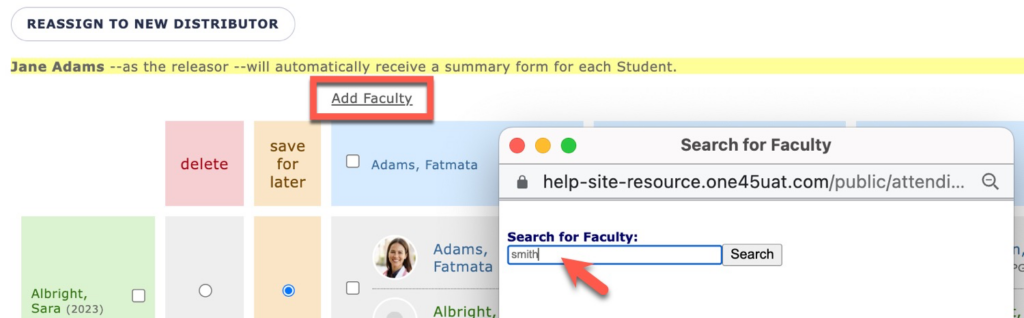
I. Review and verify the list of evaluators. If evaluator names are missing click add faculty to search for additional names.
II. Enter the first couple of letters of the name of the missing evaluator and click Search.
III. A list of accounts on the system will appear. If you see the name you were looking for click the radial button beside it and then hit Add to list.
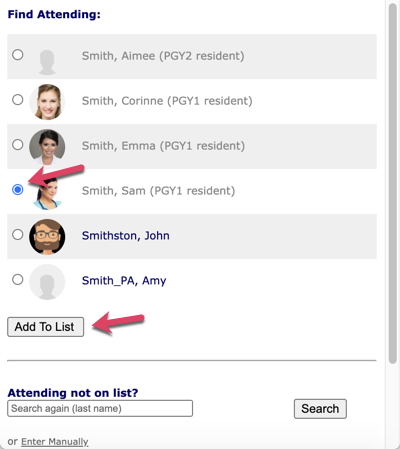
IV. If the name did not appear make sure the spelling is correct. Search on other possible spelling options through the ‘Faculty not on list’ tool. When the name is located click beside it and hit add to list as above.
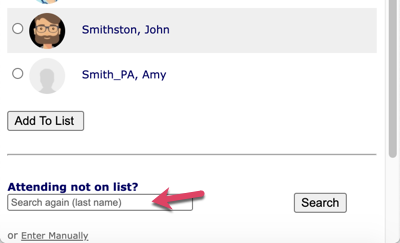
V. (OPTIONAL) – If the name is not listed in the system click on Enter manually to input the evaluators first name, last name and email address and then submit the information. A new eDossier account will be added into the system and the new user will receive their login information the first time they are sent an evaluation to complete. It is very important that you input their email address so they can receive an email notification when they have a form to complete.
VI. Match the Evaluators to the Targets
Click on the name of the target to highlight their name in yellow. Scroll across the page and check under the name of each evaluator required to fill out an evaluation on the resident/student.
If you are unsure who the evaluators will be for all of the residents/students you can leave the save for later option selected for those targets (please note: this save for later option is only available for scenarios where an attending is evaluating a student).
After you send the forms to the other recipients chosen the item for the targets who did not have an evaluator selected will remain in your To Do tab for you to select at a later time.
4. Click Send forms after you have reviewed and confirmed your matches.
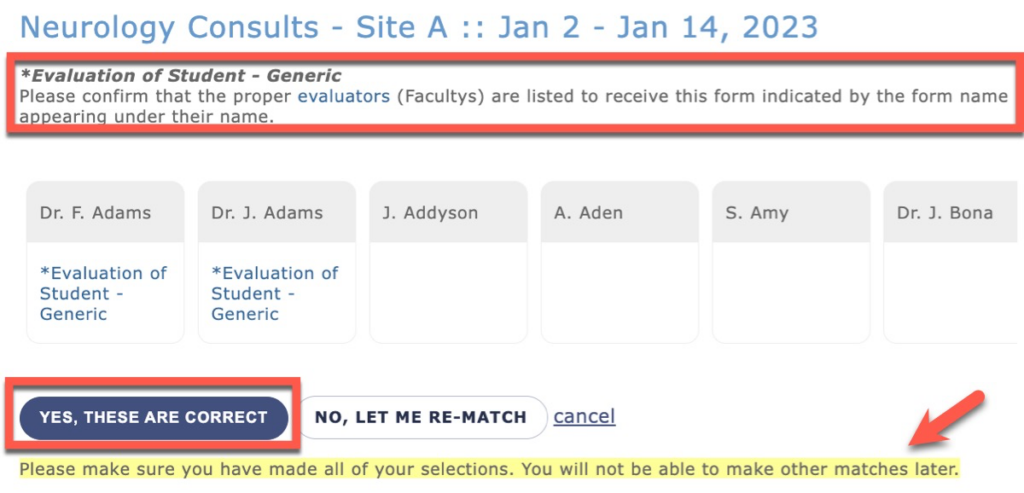
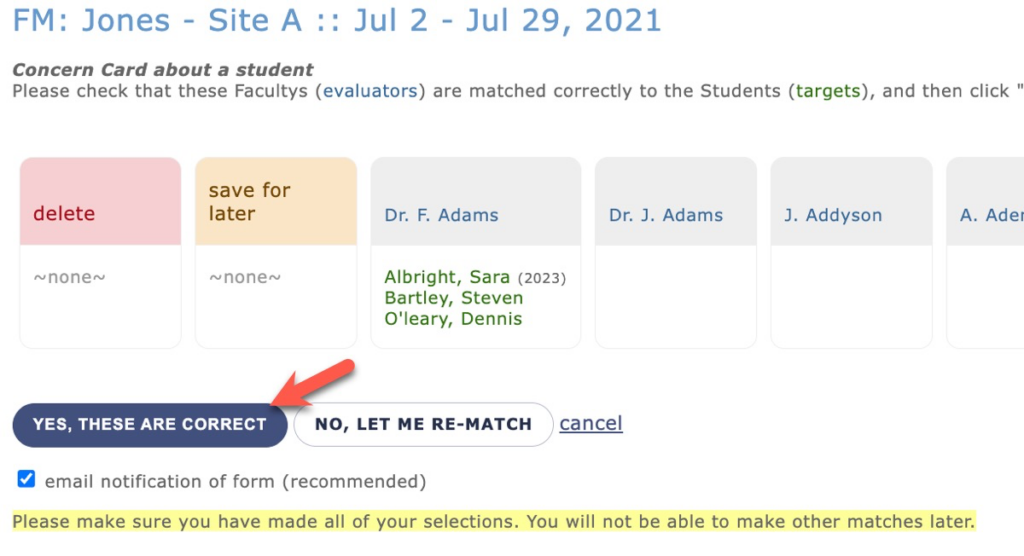
5. Review the selections to verify that the matches are correct.
A new page will open showing you the selections you have made. The resident/student names will appear below the evaluator names you have chosen for them. If you notice at this time that errors were made in your selections click “No, let me re-match” to start the process over.
6. Click Yes, these are correct to send out the evaluation forms.
Once you’ve finished a task it is removed from your To Dos subfolder. The evaluators that you chose to complete the forms will receive an email notifying them that they have forms to complete.
Forms can be sent out with the option for the evaluator to opt out of completing the form. If this option is enabled, and the evaluators chooses to opt out, you may be asked to approve the opt out.
How do I approve an opt out request?
1. If you have opt outs to confirm, you will see them in your To Dos.
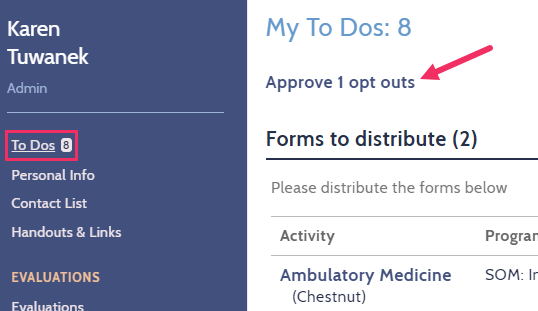
2. When viewing your opt out requests, you can view the details of each evaluation, including the opt out reason, if given. From this screen you can either click approve or don’t approve. If you approve, the evaluation will be deleted. If you don’t approve, the evaluation will be sent back to the evaluator to complete.

Why have I been asked to confirm and opt out?
Having the ability to opt out is set by a permission on the back-end of the system. If you have opt outs in your To Dos to confirm, this permission is enabled for your account.
To add or remove this permission from your account, contact your institution’s main One45 administrator. They will likely be able to edit this option for you.
As a faculty member, you may be granted access to manage your curriculum session event mappings, objectives, or handouts and links. Using the Curriculum Explorer feature, you’ll be able to access your assigned curriculum to make the necessary edits.
Please Note: If you require specific access to your curriculum, please contact your institution’s Super Administrator for further assistance.
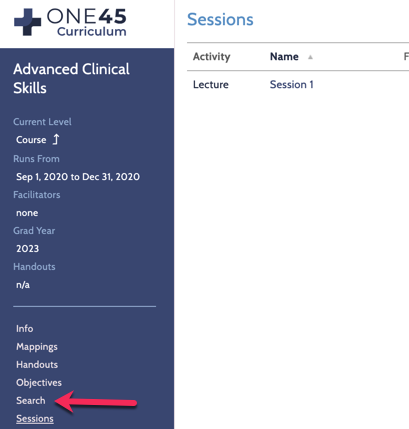
1. To edit your curriculum events access the Curriculum Explorer by clicking on My Courses from your eDossier.
2. You will then see all courses that you currently have access. To view or edit the information of a specific portfolio, course or session, click on the corresponding portfolio or course link.
3. Based on the permissions that have been assigned to your particular curriculum role, you will then be able to view and edit various details related to the course. These can by accessed using the menu bar along the left-side of the screen (Info, Mappings, Bulk Mappings, People, Handouts, etc):
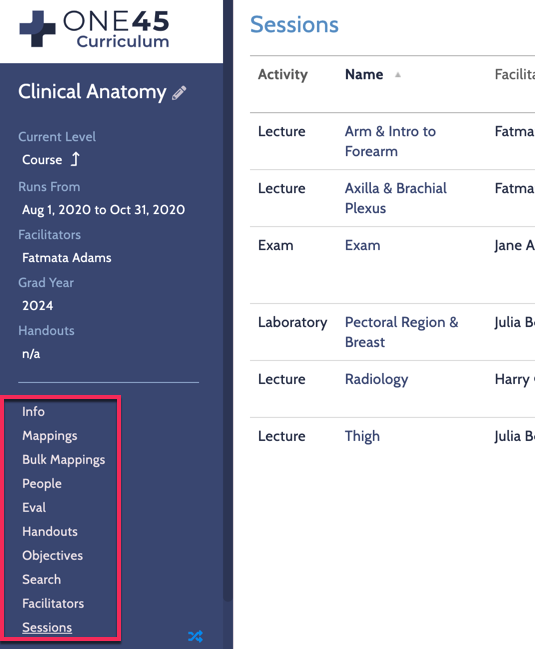
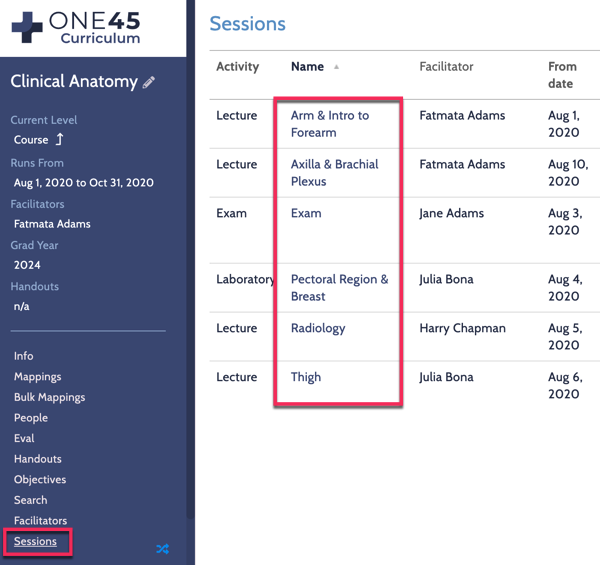
4. To edit the sessions (events) within the course, click on the Sessions link from the menu bar along the left-side of the screen. Then click on the name of the session that you’d like to edit.
5. Depending on the permissions that have been assigned to your particular curriculum role, you will then be able to view and edit various details related to the sessions with the selected course. These can by accessed using the menu bar along the left-side of the screen (Info, Mappings, Bulk Mappings, People, Handouts, etc):
Once you have navigated to the specific area of the curriculum that you’d like to edit, you have a number of options available:
Viewing or Editing Mappings:
To edit your mappings, click on the Mappings option from the menu bar along the left-side of the Curriculum Explorer screen.
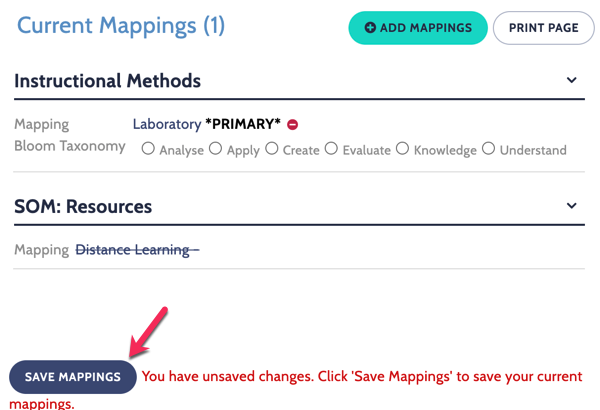
Deleting Mappings:
To delete any mappings that are no longer applicable use the del link next to the mapping item.

After clicking on the del link for a corresponding mapping item, you’ll be prompted to click on the Save Mappings button to make your updates.
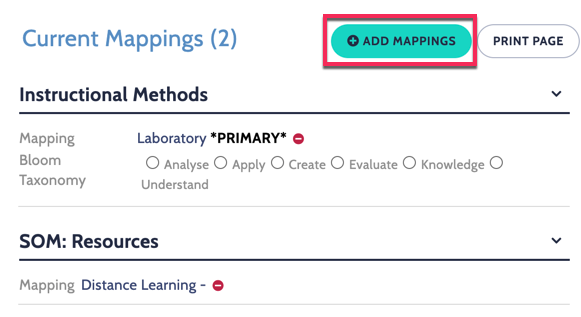
Adding Mappings:
To add new mapping items to your curriculum, click on the + icon located on the right hand side of the page.
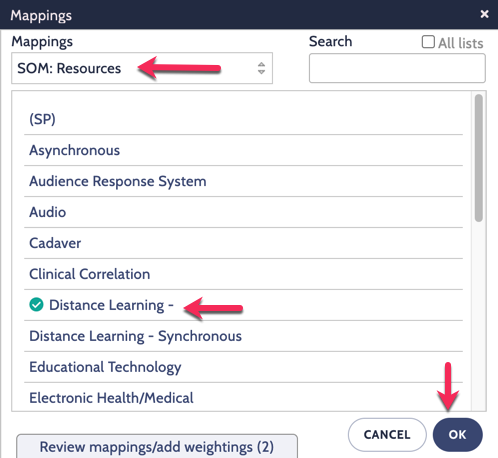
The Mappings interface will appear where you can select the desired mapping list from the Mappings drop down menu, then click on any of the mapping items that you’d like to add. You may jump between multiple lists to select items, use the search feature, or review what items you’ve selected as well:
Once you’re done, please click on the Ok button to save your mappings.
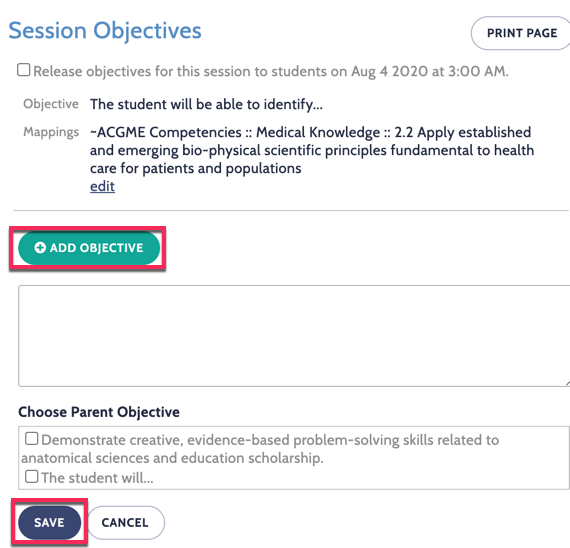
Viewing Objectives:
To view your objectives, click on the Objectives option from the menu bar along the left-side of the Curriculum Explorer screen.
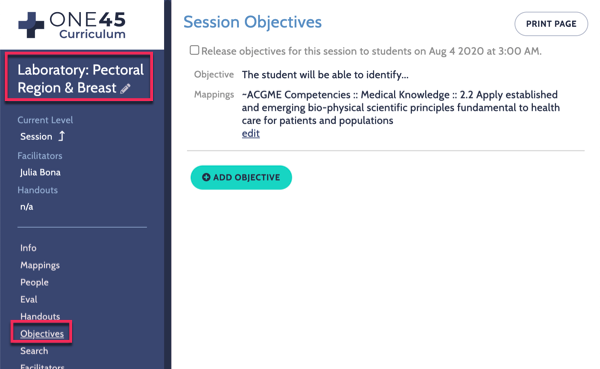
Editing or Deleting Objectives:
There may be objectives that are currently associated with the area of the curriculum in which you can review.
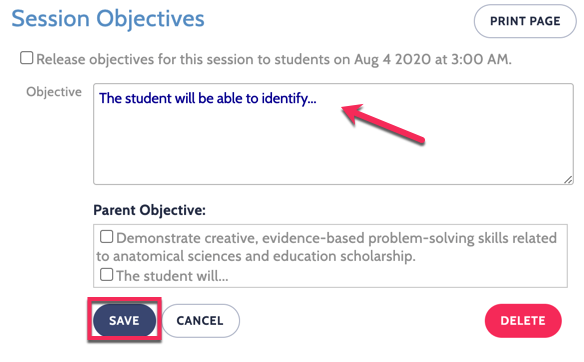
To edit an objective, click on the objective text and it will refresh to allow you to edit the objective text. Click on the save button to submit the changes.
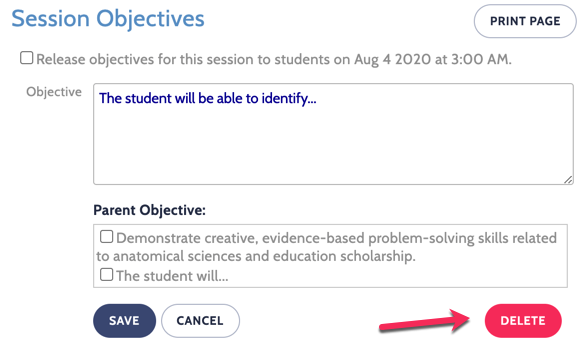
To delete an objective, click on the objective text and it will refresh to allow you to edit the objective text. Click on the delete link.
(Note: You will not be asked to confirm if you’d like to delete and the objective will be deleted immediately.)
Editing or Deleting Mappings Attached to Objectives:
If you need to edit any of the mapping items attached directly to you objectives, please click on the edit link and you can follow the steps outlined above for viewing or editing mappings to complete the task:
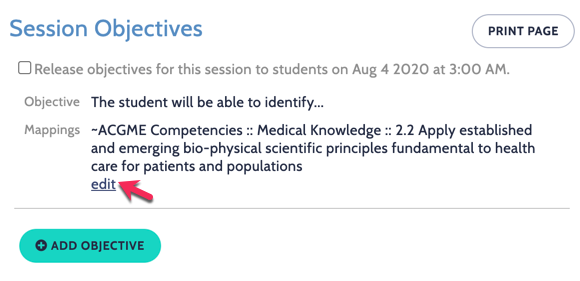
Adding New Objectives:
To add a new objective, click on the + add objective link to get a text box to enter in your objective text. Once completed, click on the save button to submit the new objective.
After evaluations are distributed the can be tracked through the evaluations tab.
To view the evaluations:
1. Click on the ‘Evaluations‘ tab in your eDossier.
2. Select the date range at the top for which you wish to track/view the evaluations. For quick search options select the radio button beside ‘last month, last 6 months, or all’.
3. Click on the line ‘Forms you distributed’ to access/track the evaluations.
Permissions regarding the evaluations need to be set-up with the One45 representative. If you do not see any of the options listed below and require them please contact the main program administrator who can contact their One45 representative to have this feature turned on for you.
Tracking Features (on the right of each line):
Status – Track whether the forms have been completed (a check mark indicates that a form has been done).
View – Click on this link to see the completed evaluation. To print off completed evaluations click ‘file ‘print’ on the top of the page after the clicking on the ‘view’ option.
Email – This feature allows you to send personalized email reminders to individual evaluators.
Fill in – This feature allows you to transcribe the evaluation on behalf of another evaluator. This feature should be used if you are given a printed copy of an evaluation which needs to be entered into the system.
Print – The print link will open a blank paper copy of the evaluation form to fax/handout to evaluators who do not have computer access. When a paper copy is received you can transcribe the information into the system on behalf of the evaluator (if the option is turned on).
Bulk Email Reminder (above Evaluator names)- This feature allows you to send personalized email reminders to the all evaluators with outstanding forms.
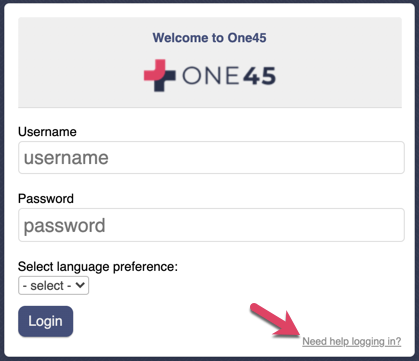
Log In Issues
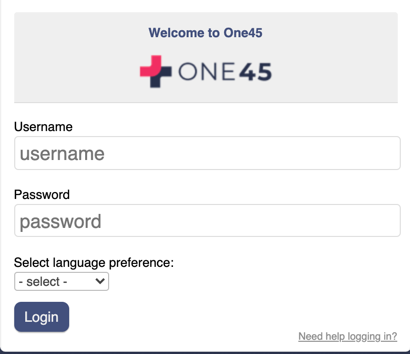
If you need to reset your password, please initiate the password recovery workflow from your school’s One45 login page by clicking the Need help logging in? link:
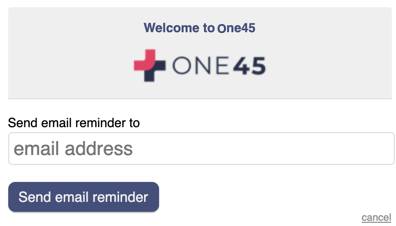
From there, enter in the email address you have associated with your One45 account:
You will receive an email from your school name as the sender, and the subject line: One45 login information.
If you do not receive the email, please check your junk/spam email folder or verify with your program admin that the email you are using is the same as in one45.
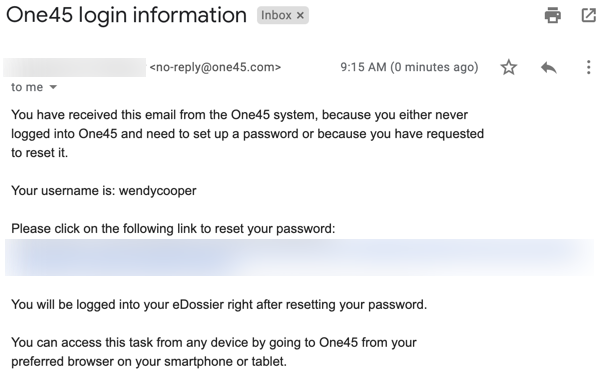
The body of the email will contain your username and a link to your password reset page. Click on the link.
*Please note that by default, the link is valid in your email for 10 minutes and can be clicked on multiple times during that 10 minute period. But it will expire right after the password is reset.
The 10 minute time limit is a default setting, it’s possible the limit is more or less than 10 minutes depending on your specific institution preferences.
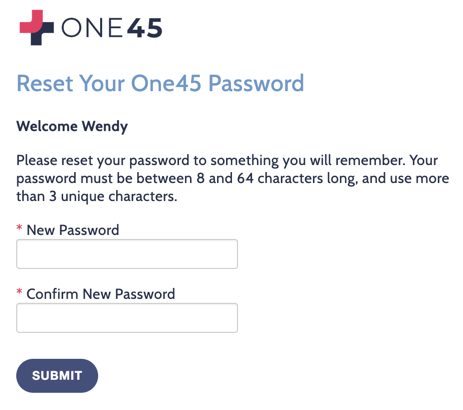
From there you will be asked to create a new password.
One45 password policy: Minimum 8 characters, more than 3 unique characters.
After clicking Submit, you will be taken to your eDossier account.
If your school isn’t using the same login information for all its software and programs (sometimes referred to as SSO or Single Sign On), you can update your One45 username and password at any time.
To perform this easy task:
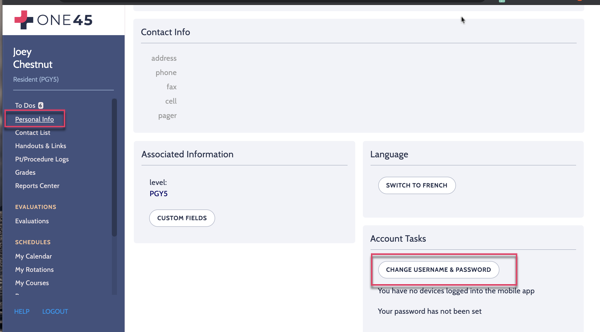
- Log into One45.
- Click on your Personal info link.
- Under the heading Account Tasks click Change Username & Password:
4. You can change your username or password, or both. Click on Ok to confirm each change.
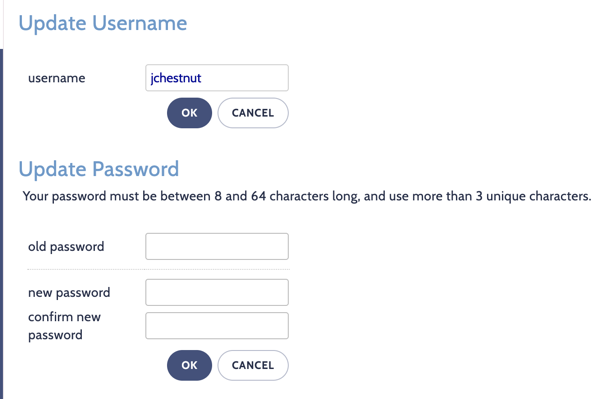
One45 password policy: Minimum 8 characters, more than 3 unique characters.
If you don’t know your old password, you can follow the reset password process outlined here.
Calendar Sync
When you sync your One45 calendar to your preferred calendar application using the calendar sync steps outlined. Here are the details you can expect to be included for each calendar type:
Curriculum
- the location field will include building and room information
- name will be the name of the item, the activity type, the name of the session
- description breaks out the information in the name into separate items and also includes the names of the facilitators
Academic Half Day
- the location will include the location from the event
- the name will be the name of the event
- the description will include the topic and the names of the presenters
Rotation
- location will be the site
- name will be the name of the rotation
- description will include the site, the service, and the name of the preceptors
- if the person is supposed to see a note, they will also see the note in the description
1. Log into One45
2. In your eDossier click on Manage Calendar Feeds under Schedules
3. If you haven’t already done so, click on Generate subscription URL
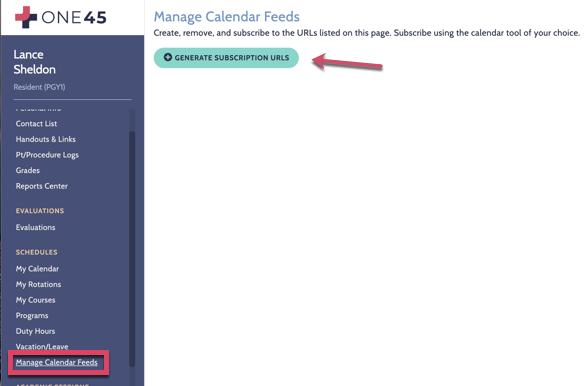
4. Once a URL has been generated, copy the URL and follow the tool or device-specific instructions given on this page to subscribe to the calendar URL.
How do I turn off my One45 calendar subscription?
1. Log into One45.
2. In your eDossier, click on Manage Calendar Feeds under Schedules.
3. Click on the Delete URL button next to your calendar subscription URL.
4. Once this URL disappears, devices or tools using it will no longer display any events from the calendar.
Why is my calendar subscription not showing new or changed events?
Some possible reasons for this include:
- Your device or calendaring tool does not show updates to your calendars in real-time. Some services (like Google Calendar) only guarantee calendar updates every 8 hours. This limitation is dependent on the tool or device you’re using and cannot be changed.
- Your device may be experiencing internet connection issues.
- You may have imported your One45 calendar instead of subscribing to it. If so, you will not see any updates to it. Ensure you added a URL instead of an *.ics file to your calendaring tool. See the section on ‘What is the difference between subscribing vs. importing calendars’.
- You may have subscribed to an empty One45 calendar. In this case, you should see a single event on today’s date notifying you that the calendar is empty.
- Your subscription URL may have been deleted from the “Schedules > Manage Subscriptions” page found in your One45 eDossier. Check to ensure you are using the generated URL found here.
- Your school may have turned off calendar subscriptions.
What devices and tools do you support for calendar subscriptions?
One45 provides support for the following calendaring tools and devices:
- Google Calendar
- Android devices
- Apple Calendar
- iOS devices (iPhone, iPad)
- Microsoft Outlook (2007+)
Can I update my One45 calendar events through my calendaring tool?
No. Subscribing to a One45 calendar is read-only. Updating events in a subscribed calendar will not update these events within One45.
What is the difference between subscribing vs. importing calendars?
Most calendaring tools will let you either import or subscribe to external calendars.
Importing is done by downloading an *.ics calendar file from your external calendar and adding it to your tool. This will display a snapshot of what your calendar looked like at the time you downloaded the *.ics file.
Subscribing is done by pointing your calendar tool to a given URL provided by your external calendar. This will display an up-to-date version of your calendar that is continuously updated at regular intervals.
One45 recommends subscribing to your calendars to ensure any important event updates make it into your calendaring tool or device.
Why do I see duplicate calendars?
Some calendaring tools like Apple Calendar let you subscribe to a calendar feed and simultaneously sync it to the iCloud, where it will then display the calendar on any device with iCloud enabled. You will see duplicate calendar feeds if you add the same calendar feed to your Apple Calendar and your iOS device (iPhone, iPad) with iCloud turned on. It’s important to note that with iCloud, you only need to add your calendar feed once. To fix seeing duplicates, simply remove one of your duplicated calendars from iCloud.
Can I subscribe to a One45 calendar using an unsupported device or tool?
While devices other than those listed above are not officially supported, our calendar subscriptions use the standardized iCal format which should work across a wide range of calendaring tools. To subscribe, please consult your tool or device’s documentation.
Why does my calendar contain an event saying my calendar subscription URL is no longer working?
Your calendar feed URL has become invalid. To remove the invalid feed consult your tool or device’s instructions for removing a subscribed calendar. You will need to re-subscribe using a valid URL.
Why does my calendar contain an event saying my calendar is empty?
This event is shown for empty calendars to notify you that the calendar feed is working. As soon as the calendar contains one or more actual events, this notification event will disappear.
When I subscribe to a calendar in Outlook, why does it give me an error?
Due to how Outlook interprets dates, you may see errors referencing “floating time” when it attempts to sync your One45 subscribed calendars. These errors are safe to ignore – your calendar data will still sync correctly.